Installations- und Konfigurationsanleitung — go-e Charger Gemini flex

1. Introduction

The information contained in these documents is the property of FENECON GmbH. Publication, in whole or in part, requires the written consent of FENECON GmbH.

Subject to changes and printing errors!

1.2. Qualification of the installing electrician

A qualified electrician is a person who has the necessary experience and training:

  • Setting up, switching on, switching off, disconnecting, short-circuiting and repairing circuits and devices

  • Standard maintenance and use of protective devices in accordance with current safety standards

  • First aid/emergency care

  • Current knowledge of local regulations, standards and guidelines

1.3. Symbols used

Before reading the manual, you should familiarize yourself with the different types of safety warnings. You should also familiarize yourself with the importance of the safety warnings.

1.4. Symbol conventions

Table 1. Symbol conventions
This symbol indicates an imminent danger. If this danger is not avoided, it can lead to death or serious injury.
This symbol indicates a potentially dangerous situation. If this dangerous situation is not avoided, it may result in minor or moderate injury.
This symbol indicates a warning. Failure to observe this warning may result in damage and/or destruction of the system.
This symbol indicates a note. It is recommended that the note be observed.

2. Product description

2.1. Scope of delivery

After you have received the delivery, check that all components have been included. Check the scope of delivery for damage. If anything is missing or damaged, please contact the supplier immediately. The following components are included in the delivery:

  • go-e Charger Gemini flex

  • Betriebs- und Installationsanleitung — go-e Charger Gemini flex (11kW/22kW)

  • RFID-Chip

  • go-e Charger Reset-Karte

2.2. Prerequisites

The following is required to use the charging station:

  • FEMS App go-e lesend

The "FEMS App go-e lesend" is not included in the scope of delivery. This must be purchased separately if not already available.

3. Commissioning

M002

Zur Installation der go-e Charger Gemini Flex Ladestation folgen Sie bitte den Anweisungen im
Installations- und Bedienungsanleitung go-e Charger Gemini flex (11kW/22kW)

This quick guide refers to the original user manuals.
It serves as an installation aid for qualified electricians in the area of communication interfaces, but is not a substitute for studying the user manuals.

Montieren Sie die go-e Charger Gemini flex Ladestation nach der Installationsanleitung der go-e GmbH.

Bitte beachten Sie, dass die Standortbedingungen der go-e GmbH gelten.

Follow the instructions for the power supply for the go-e Charger Gemini flex charging station.

3.1. Ethernet connection

Die go-e Charger Gemini flex wird über WLAN-Netzwerkschnittstelle mit dem FENECON Energiemanagementsystem verbunden. Folgen Sie bitte den nachstehenden Schritten.

Bitte beachten Sie, dass go-e Charger Gemini flex über eine WLAN Kommunikationsschnittstelle (802.11b/g/n 2,4 GHz) verfügt. Stellen Sie Ihr WLAN auf eine Frequenz von 2,4 GHz (Kanäle 1-13 mit dem Frequenzband 2412-2472 MHz).

In a network, IP addresses are typically assigned automatically via DHCP. In many cases, this is done by the internet router. The IP addresses are automatically replaced after a few weeks/months. This then leads to a communication failure between the FEMS and the charging station. IP addresses can be assigned to prevent this.

3.2. Assigning an IP address via DHCP

Nach Anschluss an das Kundennetzwerk wird der go-e Charger Gemini flex mittels DHCP eine IP-Adresse zugeteilt.
Diese IP-Adresse kann im DHCP-Server, z. B. der Fritz!Box, ermittelt werden.

Please make a note of the assigned IP address. The IP address is required below to set up the FEMS App go-e lesend.

Die IP-Adresse Ihrer go-e Charger Gemini flex kann über die go-e Charger App oder in der Geräteübersicht Ihres Routers (z. B. Fritz!Box) ausgelesen werden.

3.3. Configuration

Nach der Installation der Ladestation ist diese über WLAN mit FEMS zu verbinden.

Aktuell kann die go-e Charger Gemini flex nur über die go-e Charger App eingerichtet werden.
Laden Sie bitte die go-e Charger App im AppStore oder im Google PlayStore herunter.

Table 2. Startseite der go-e Home App
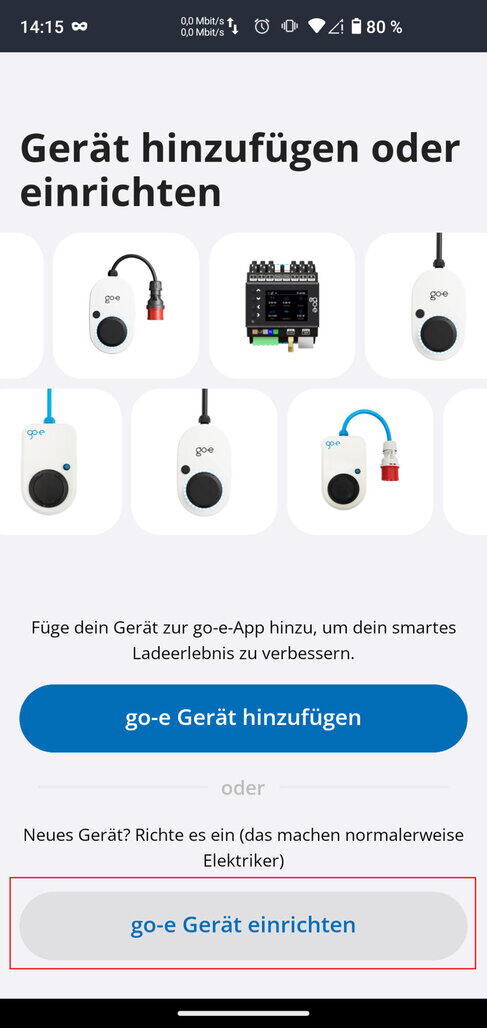
goe start
  1. Öffnen Sie die go-e Home App

  2. Klicken Sie auf den grauen Button "go-e Geräte einrichten", um eine neue go-e Charger Gemini flex einzurichten.

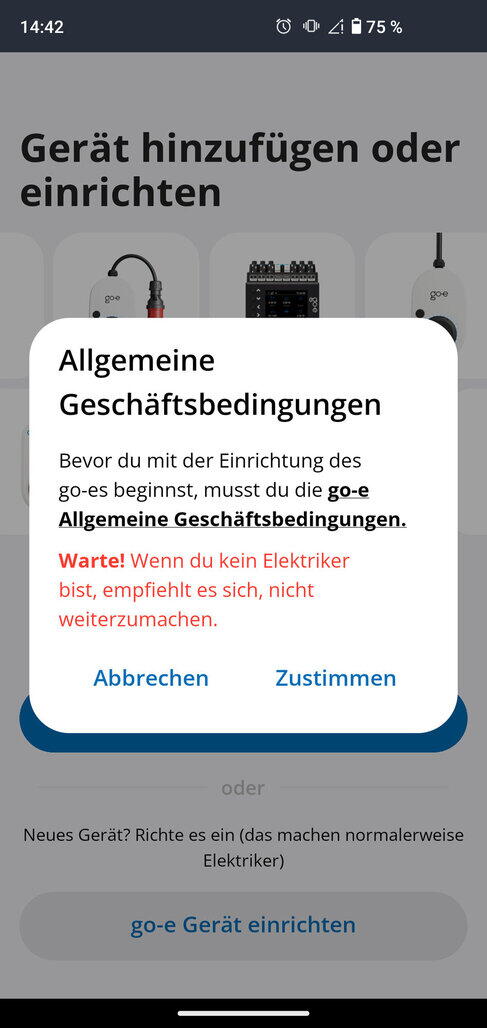
goe note
  1. Stimmen Sie den Allgemeinen Geschäftsbedingungen zu. Bitte beachten Sie den Hinweis.

Bitte halten Sie für die nachstehenden Schritte die beigelegte Reset-Karte bereit.

Table 3. Setup für Hotspot-Verbindung
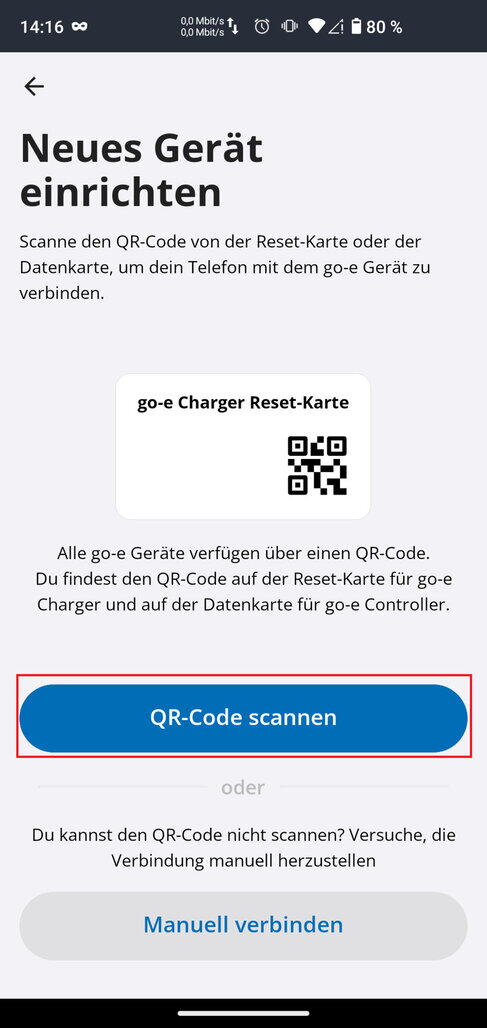
goe resetcard
  1. Klicken Sie auf den blauen Button "QR-Code scannen" und scannen Sie den QR-Code der Resetkarte.
    Alternativ können Sie manuell nach dem Netzwerk Ihrer go-e Charger Gemini flex Ladestation suchen. Klicken Sie hierfür auf den grauen Button "Manuell einrichten" und folgen Sie den Anweisungen.

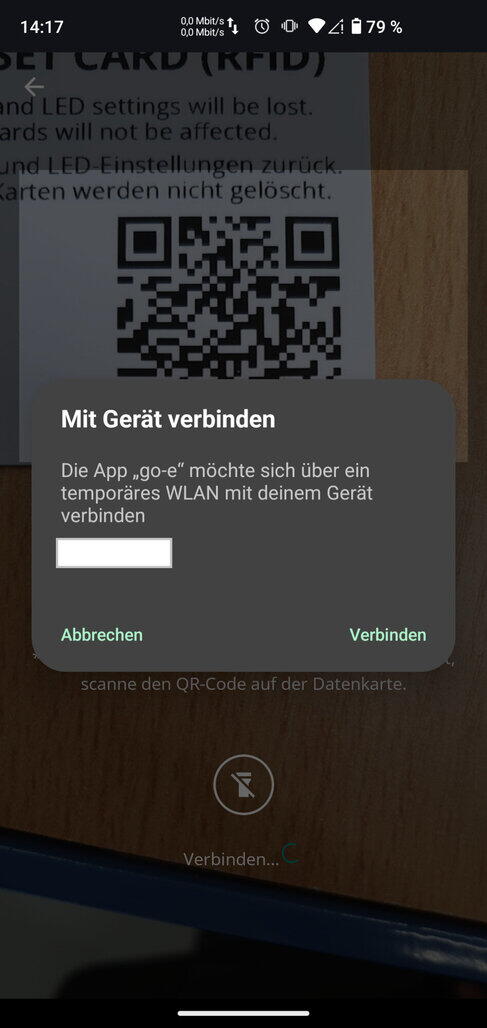
goe pairing
  1. Bestätigen Sie "Mit Gerät verbinden".
    Eventuell werden Ihnen verschiedene go-e Charger Gemini flex in der Umgebung angezeigt. Ermitteln Sie Ihre go-e Charger Gemini flex anhand der Seriennummer (Rückseite der Montageplatte). Klicken Sie auf Verbinden.

Sollten Sie keine Verbindung zu Ihrer go-e Charger Gemini flex Ladestation aufbauen können, dann deaktivieren Sie bitte probeweise die mobile Daten und die aktive WLAN-Verbindung.

Um eine WLAN-Verbindung herstellen zu können, muss eine aktive Hotspot-Verbindung zur go-e Charger Gemini flex bestehen.
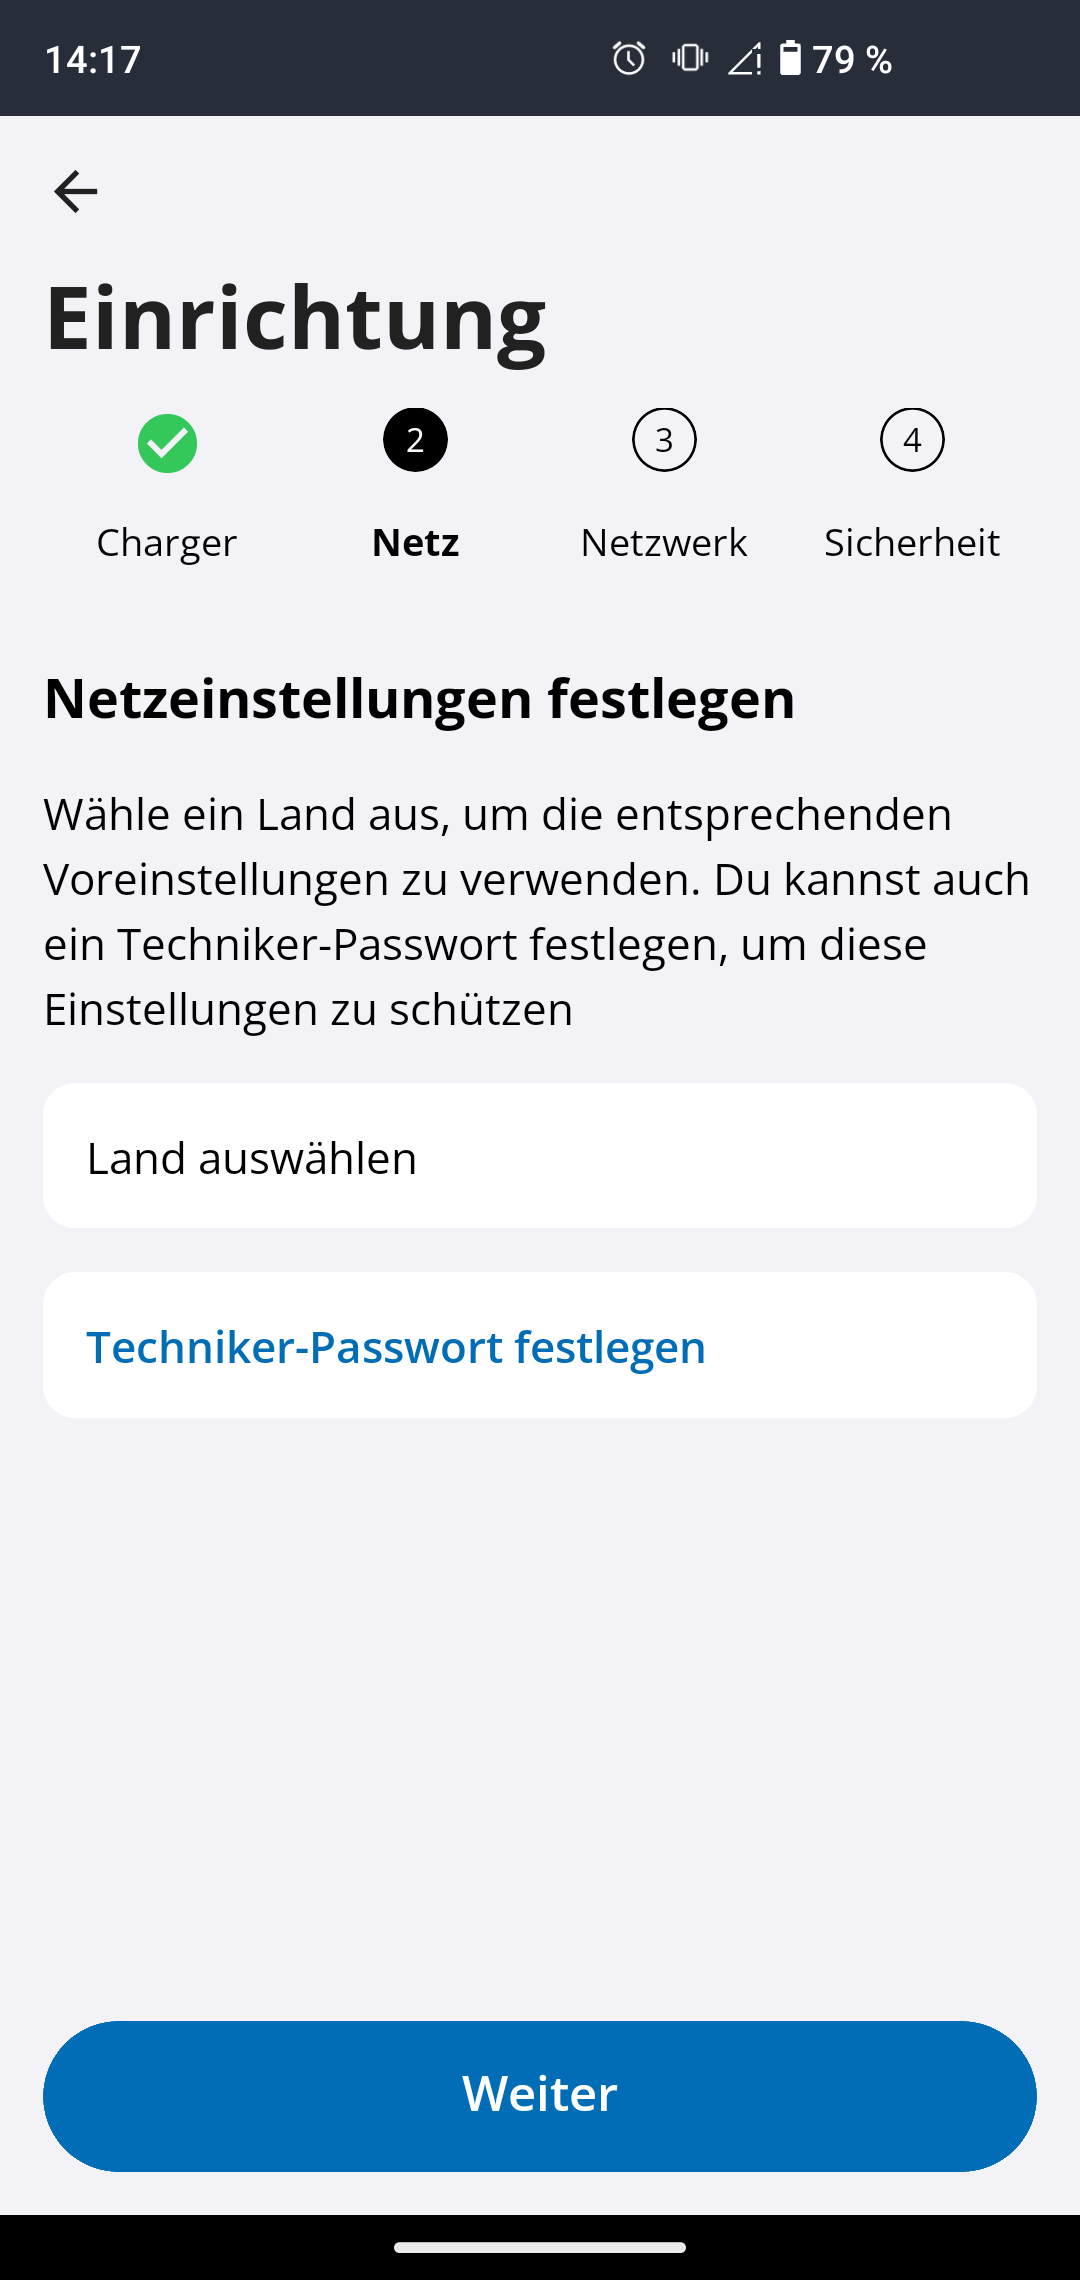
Table 4. Setup für Installateurs-Account
goe installer
  1. Nach erfolgreicher Verbindung mit dem Hotspot, können Sie einen Installateurs-Account einrichten.

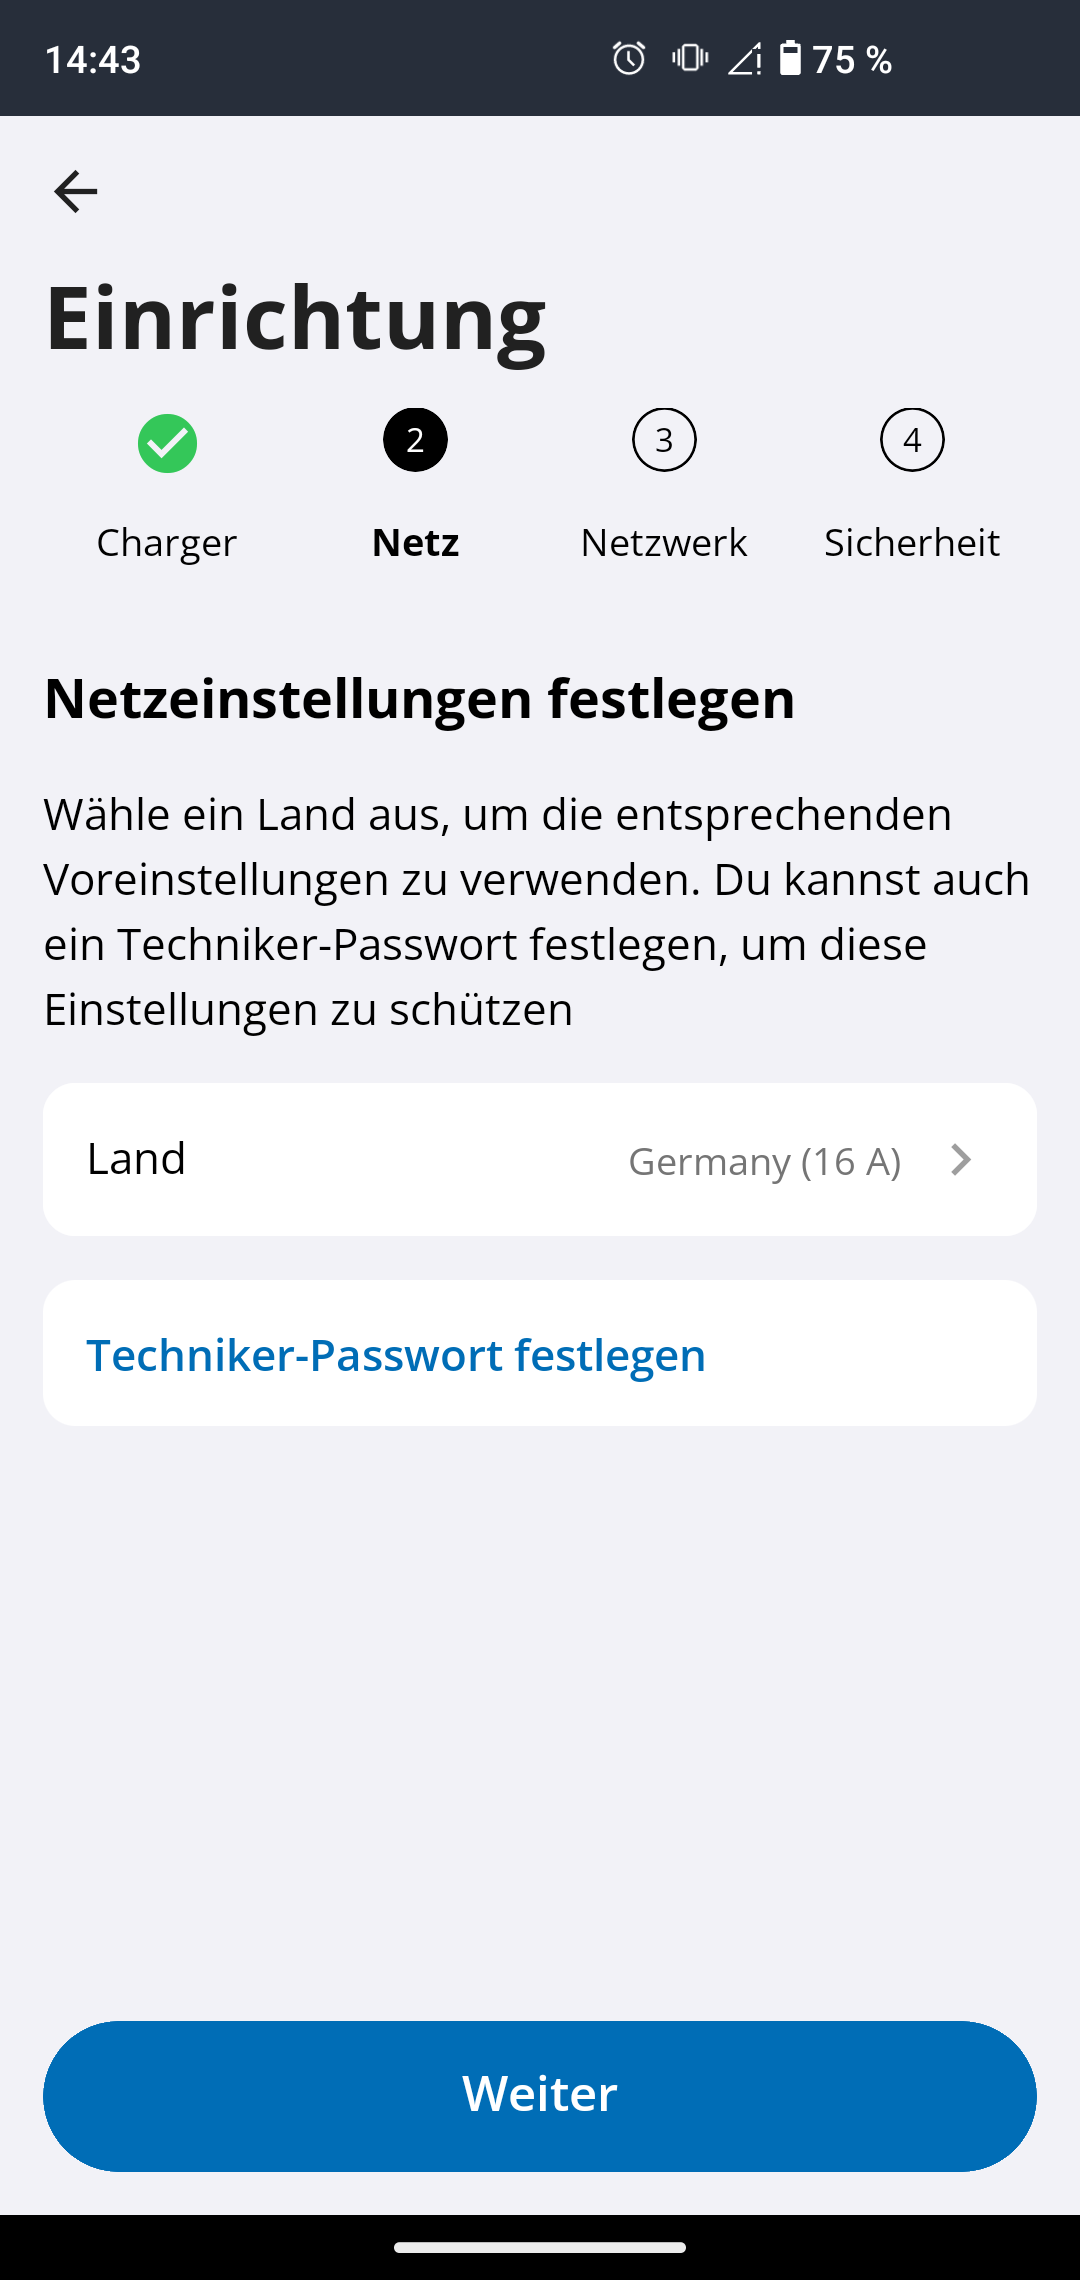
goe land
  1. Geben Sie Ihr Land an, um entsprechende Voreinstellungen nutzen zu können.
    (+) Sie können optional ein Passwort für Ihre Techniker-Einstellungen vergeben.
    Klicken Sie auf Weiter.

Table 5. Setup für Netzwerk-Verbindung
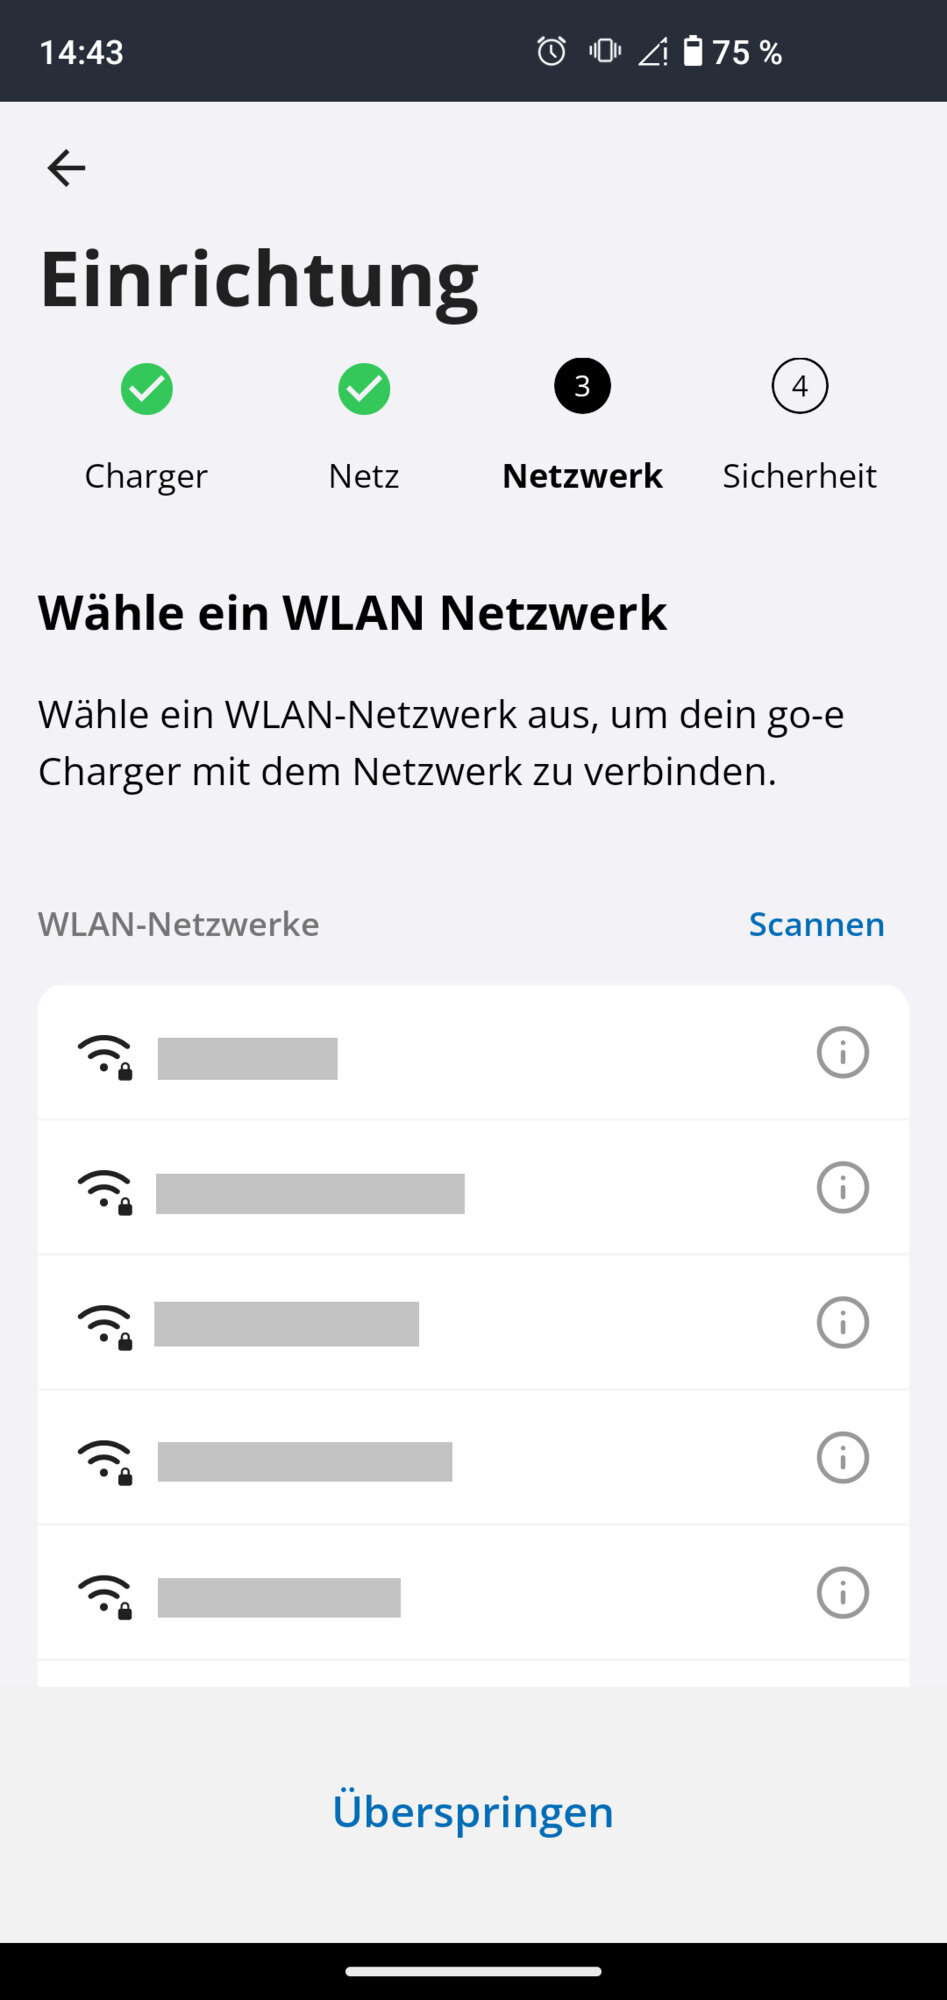
goe network
  1. Ihnen werden verschiedene WLAN-Server in der Umgebung angezeigt.

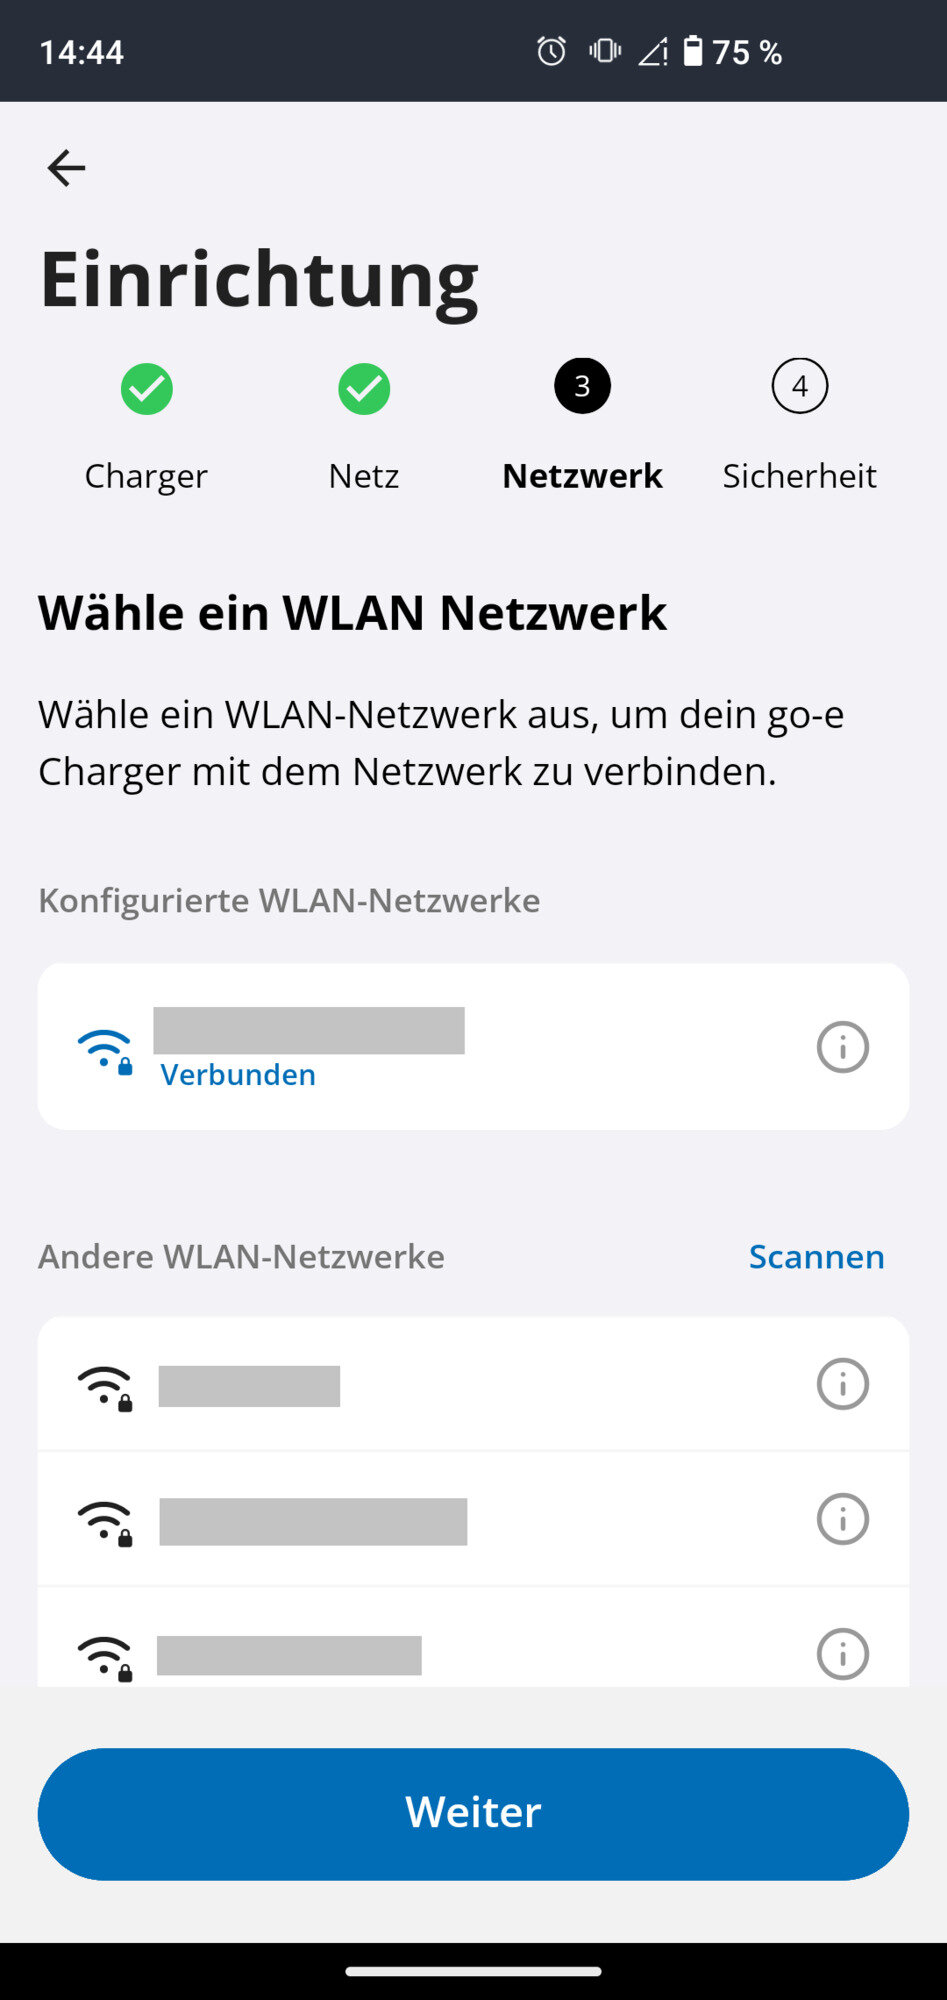
goe network 2
  1. Wählen Sie Ihr WLAN aus. Gegebenfalls werden Sie nach Ihrem WLAN-Passwort gefragt.

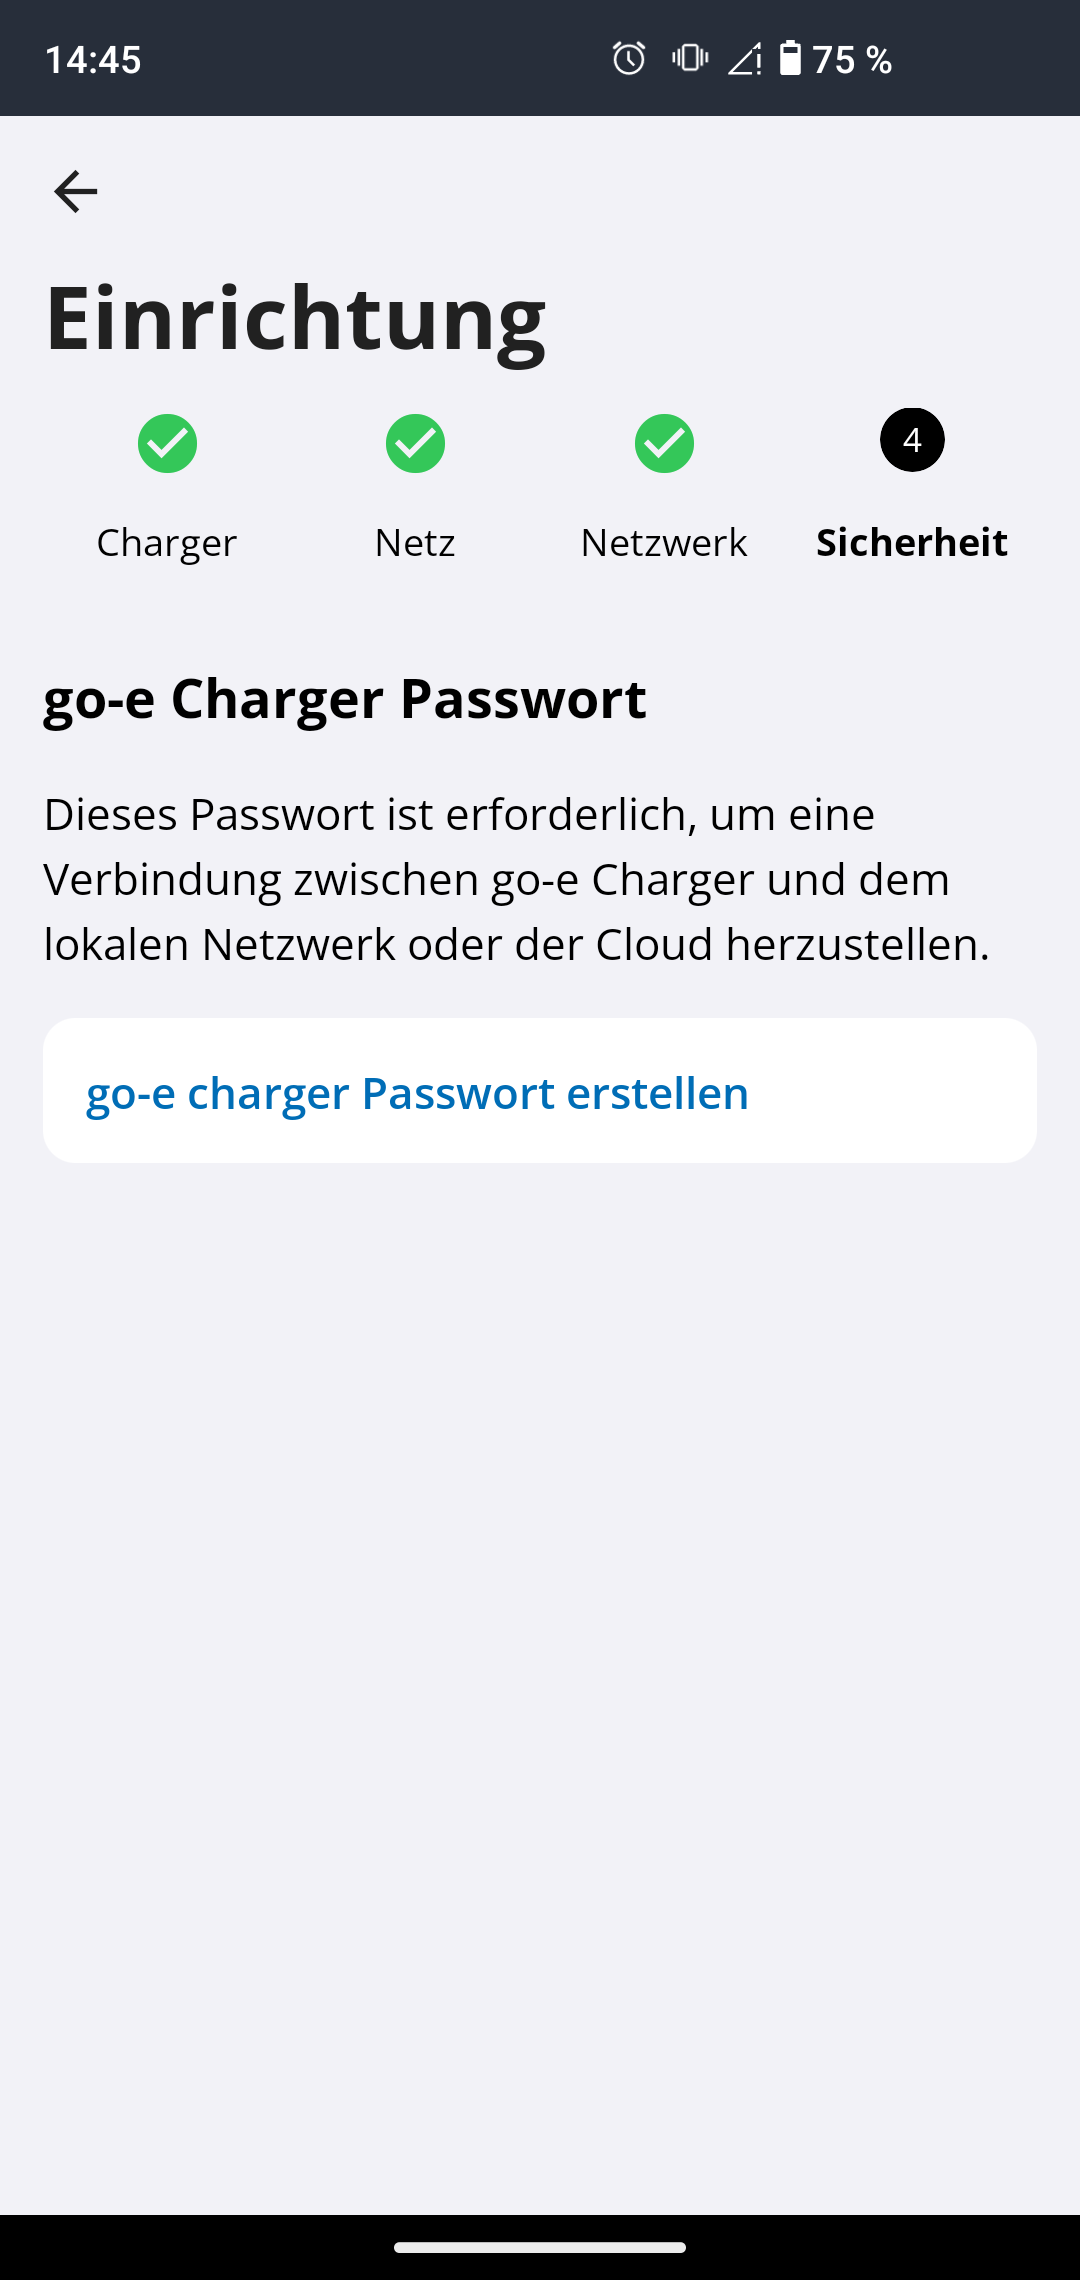
goe passwort
  1. Anschließend können Sie ein Passwort für Ihre go-e Charger Gemini flex Ladestation einrichten.

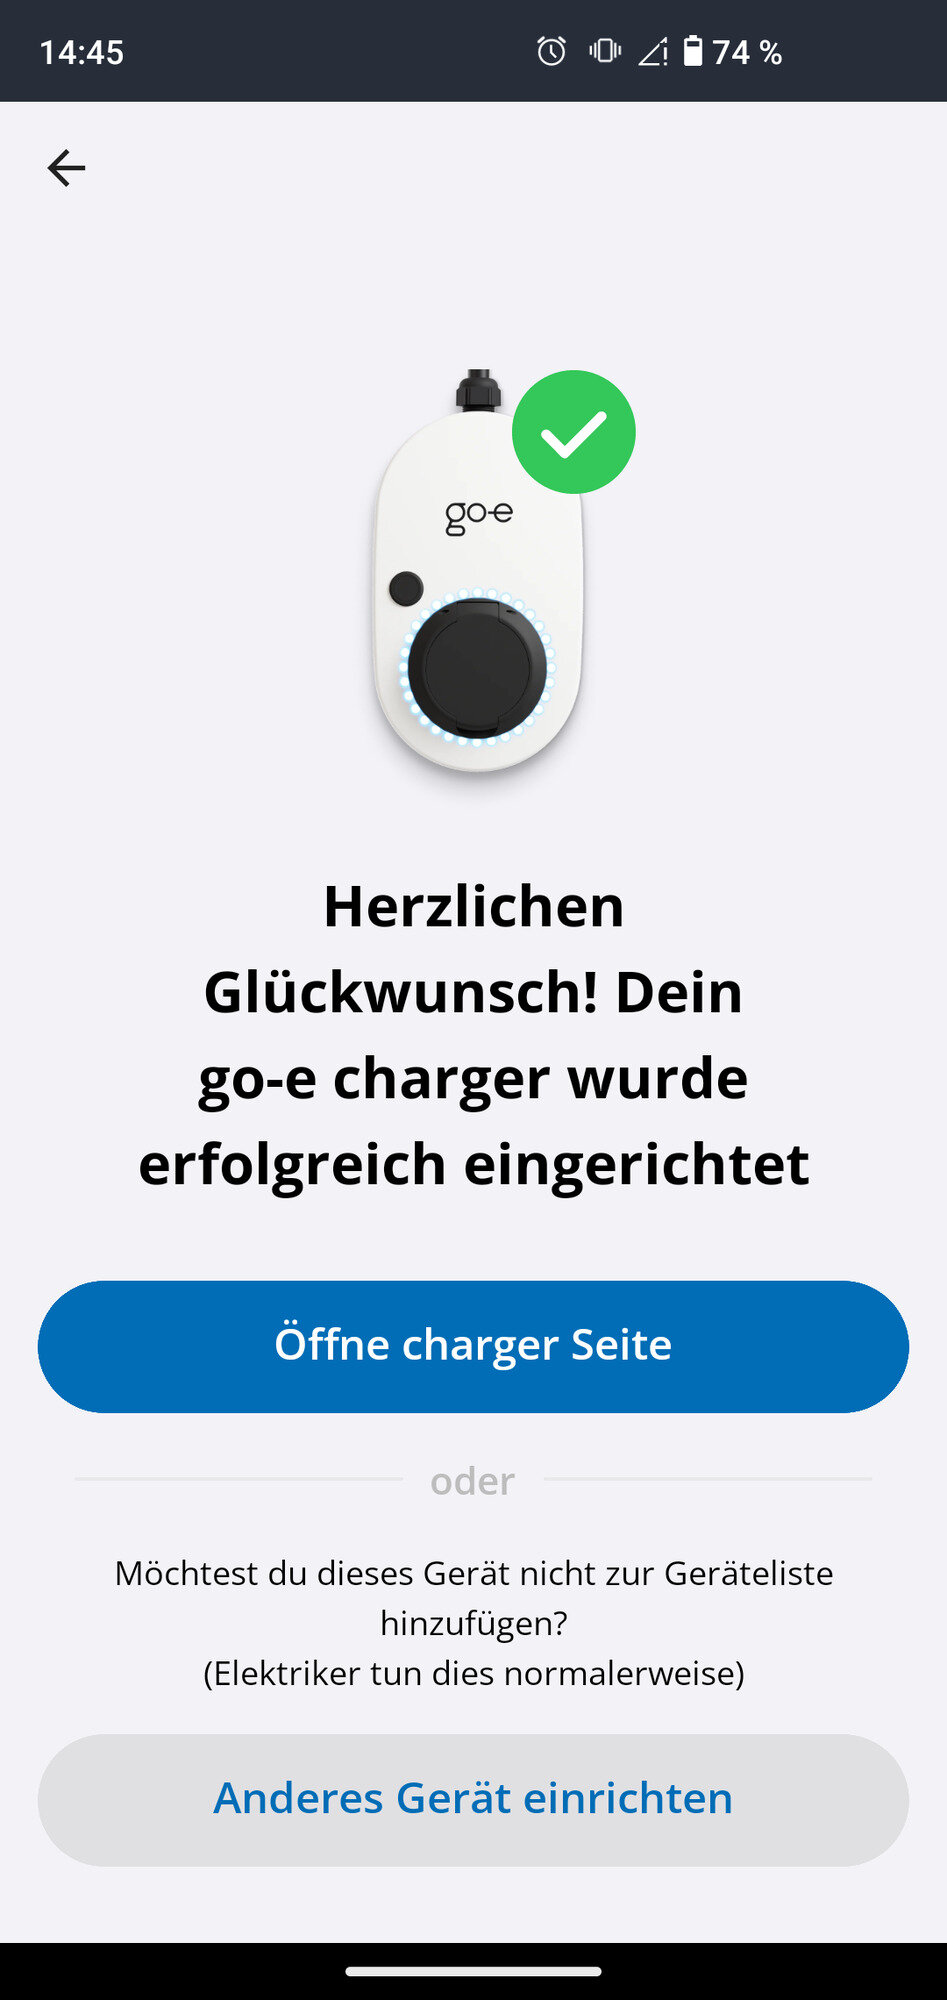
goe finish
  1. You’ve done it! You have successfully completed the electrical commissioning.

Die FEMS App go-e lesend verwendet http_v2.
Bei der go-e Charger Gemini flex Ladestation muss http_v2 in den erweiterten Einstellungen aktiviert werden.

Table 6. Configuration of the go-e Charger Gemini flex
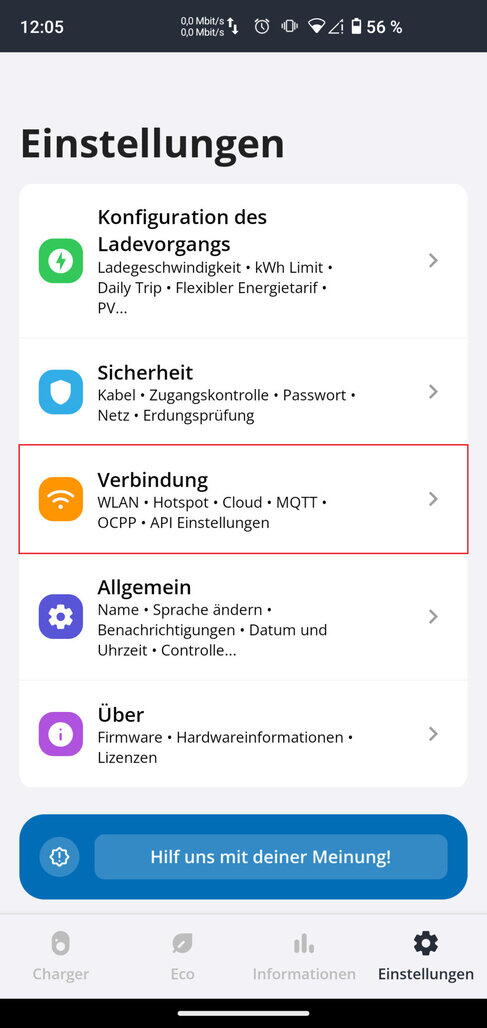
goe einstellungen
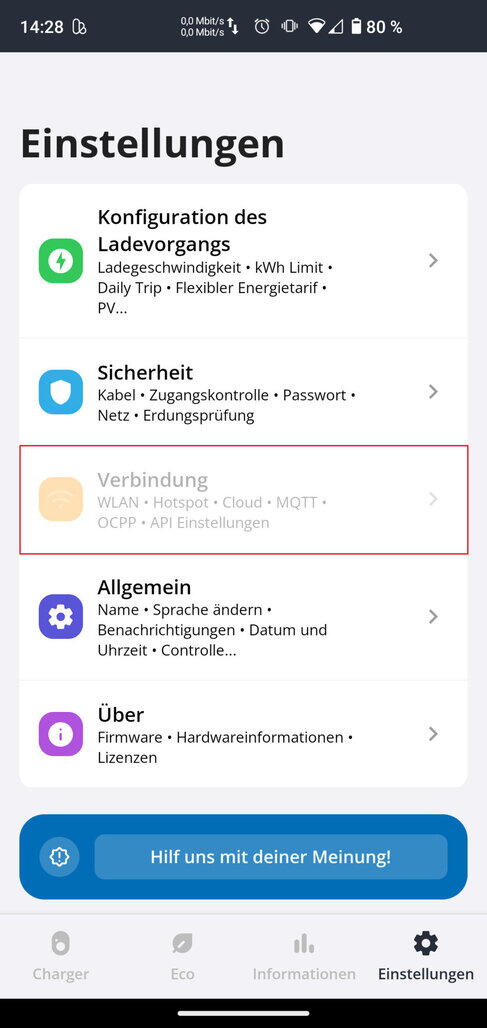
  1. Öffnen Sie hierzu bitte die Einstellungen in der go-e Home App.
    Wählen Sie den Reiter Verbindungen.

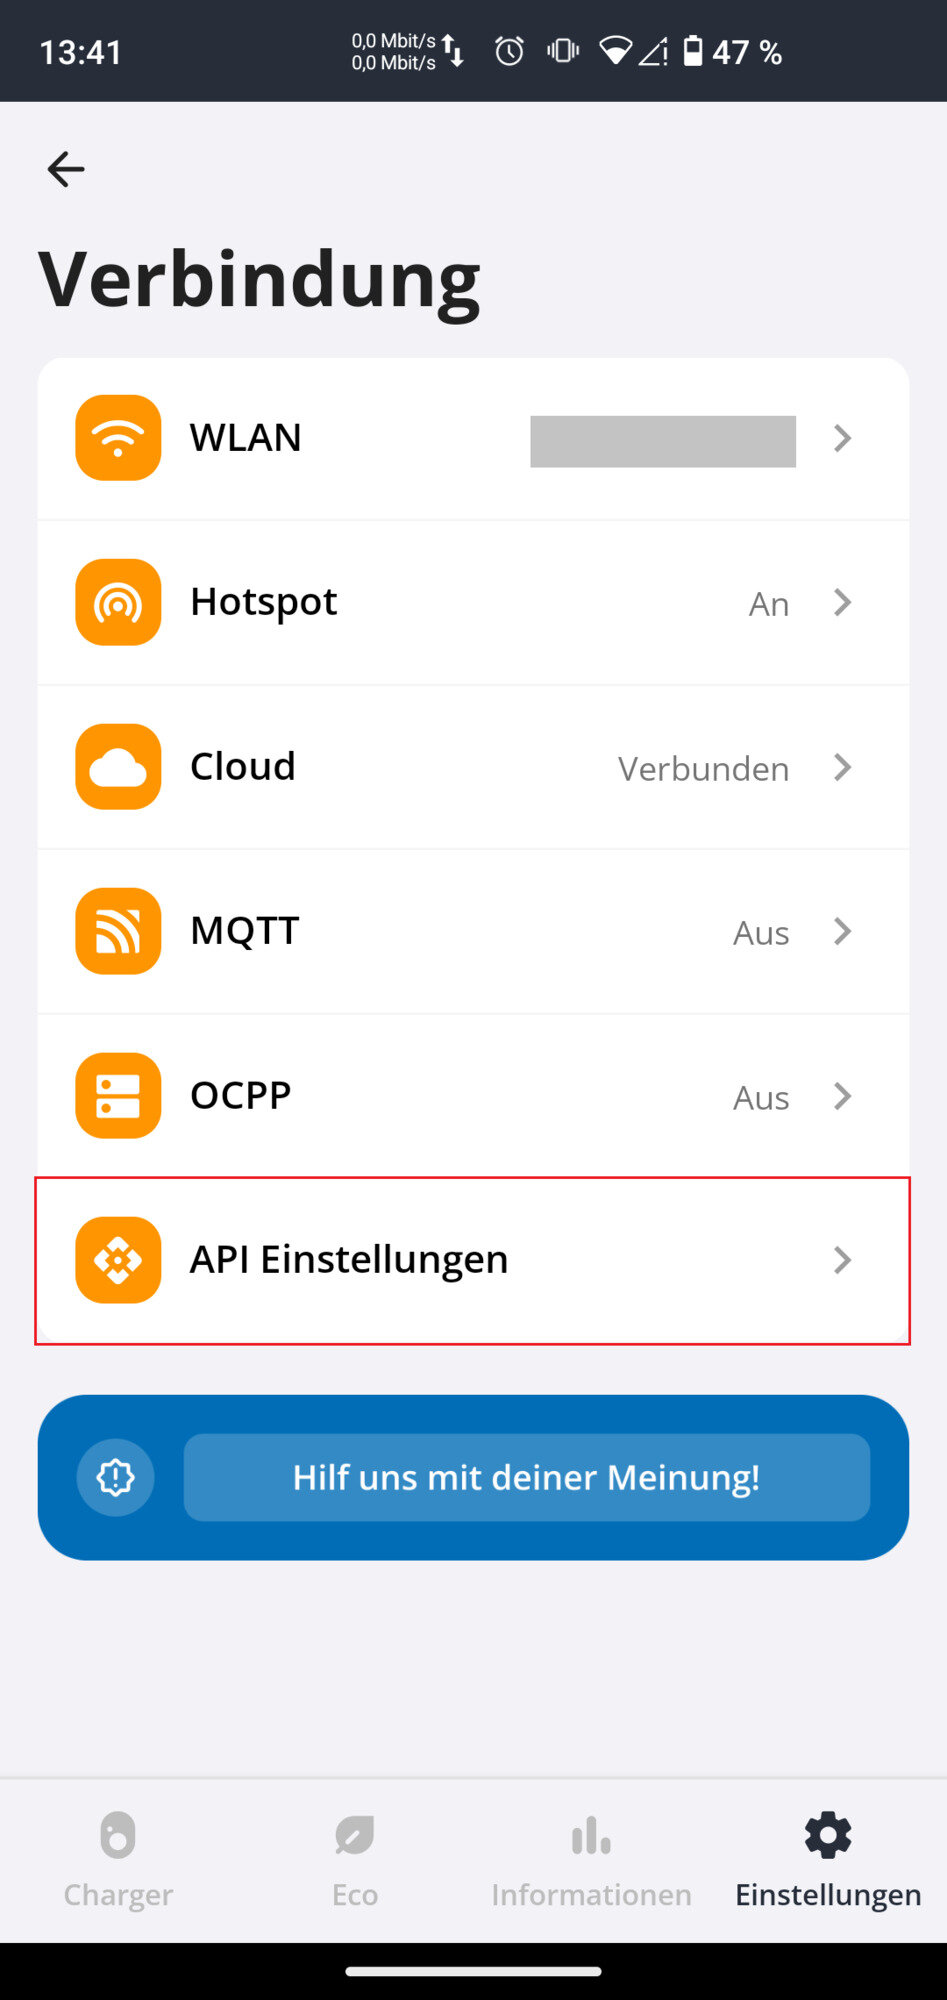
goe git
  1. Öffnen Sie im Reiter Verbindungen die Untereinstellungen API Einstellungen.

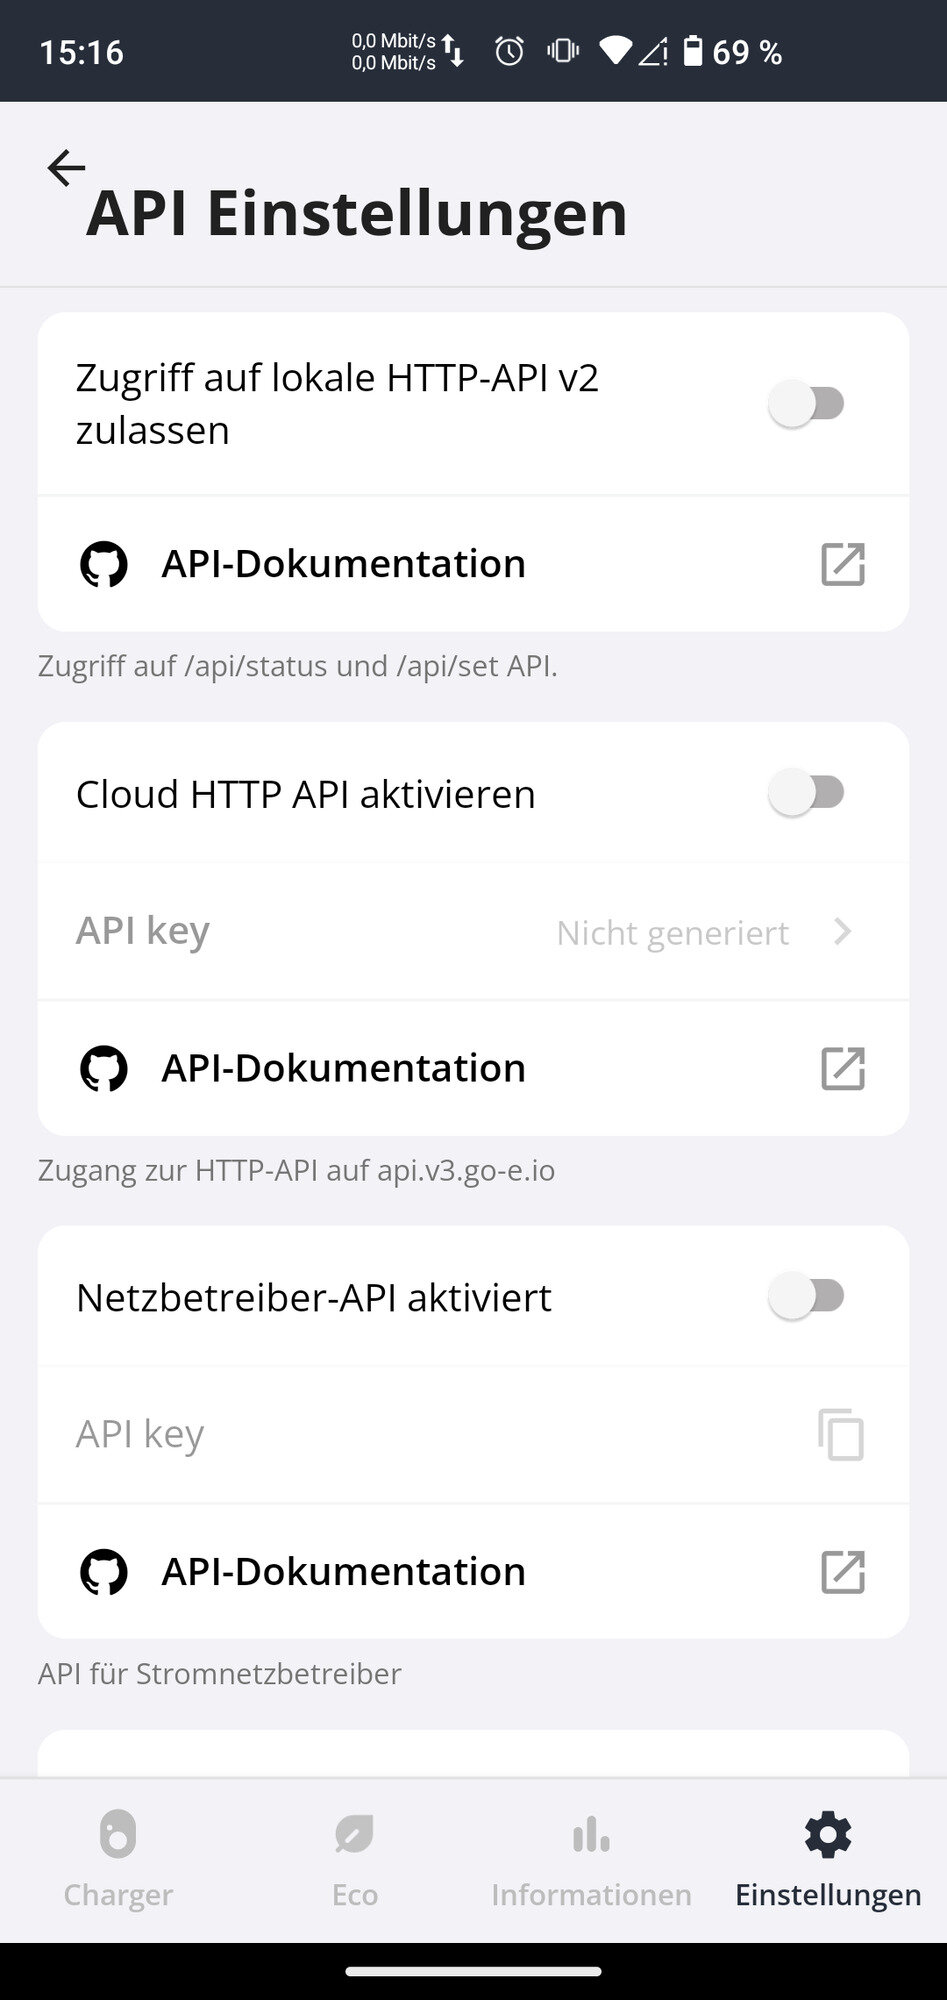
goe git 1
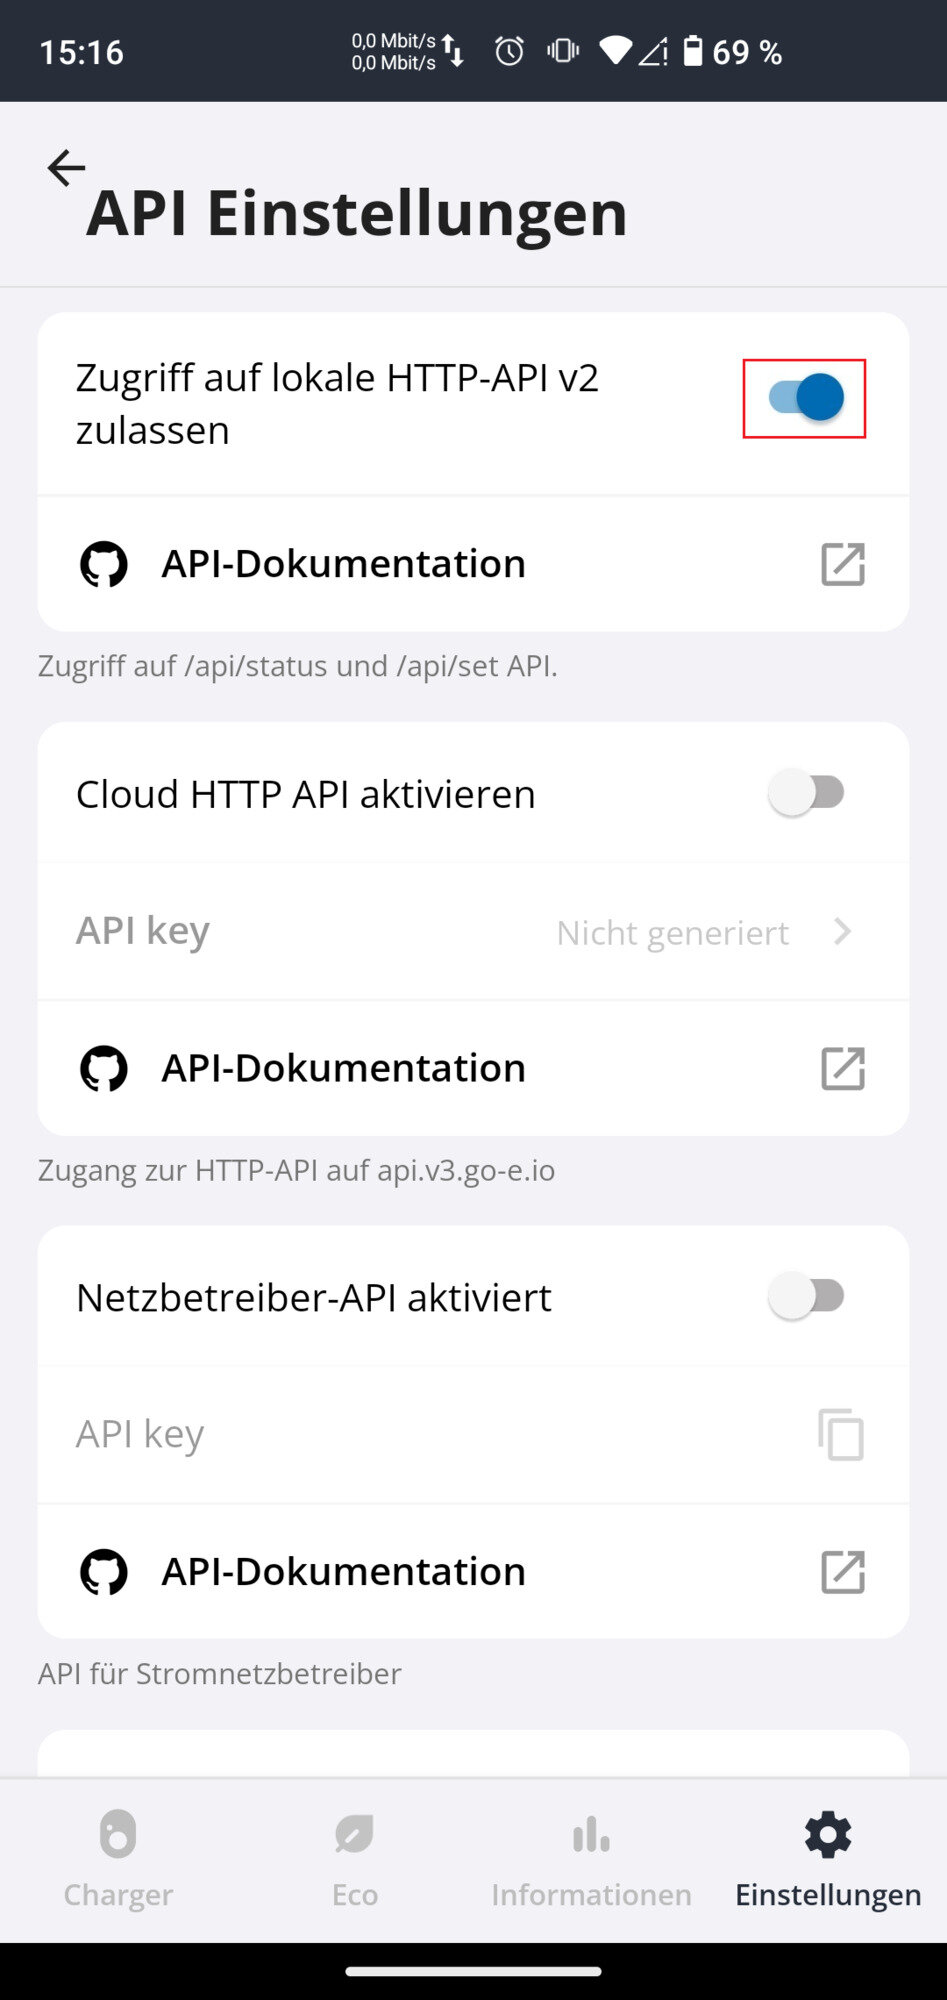
  1. Ihnen werden verschiedene API Einstellungen angezeigt.

goe git 2
  1. Aktivieren Sie Zugriff auf lokale HTTP-API v2 zulassen.

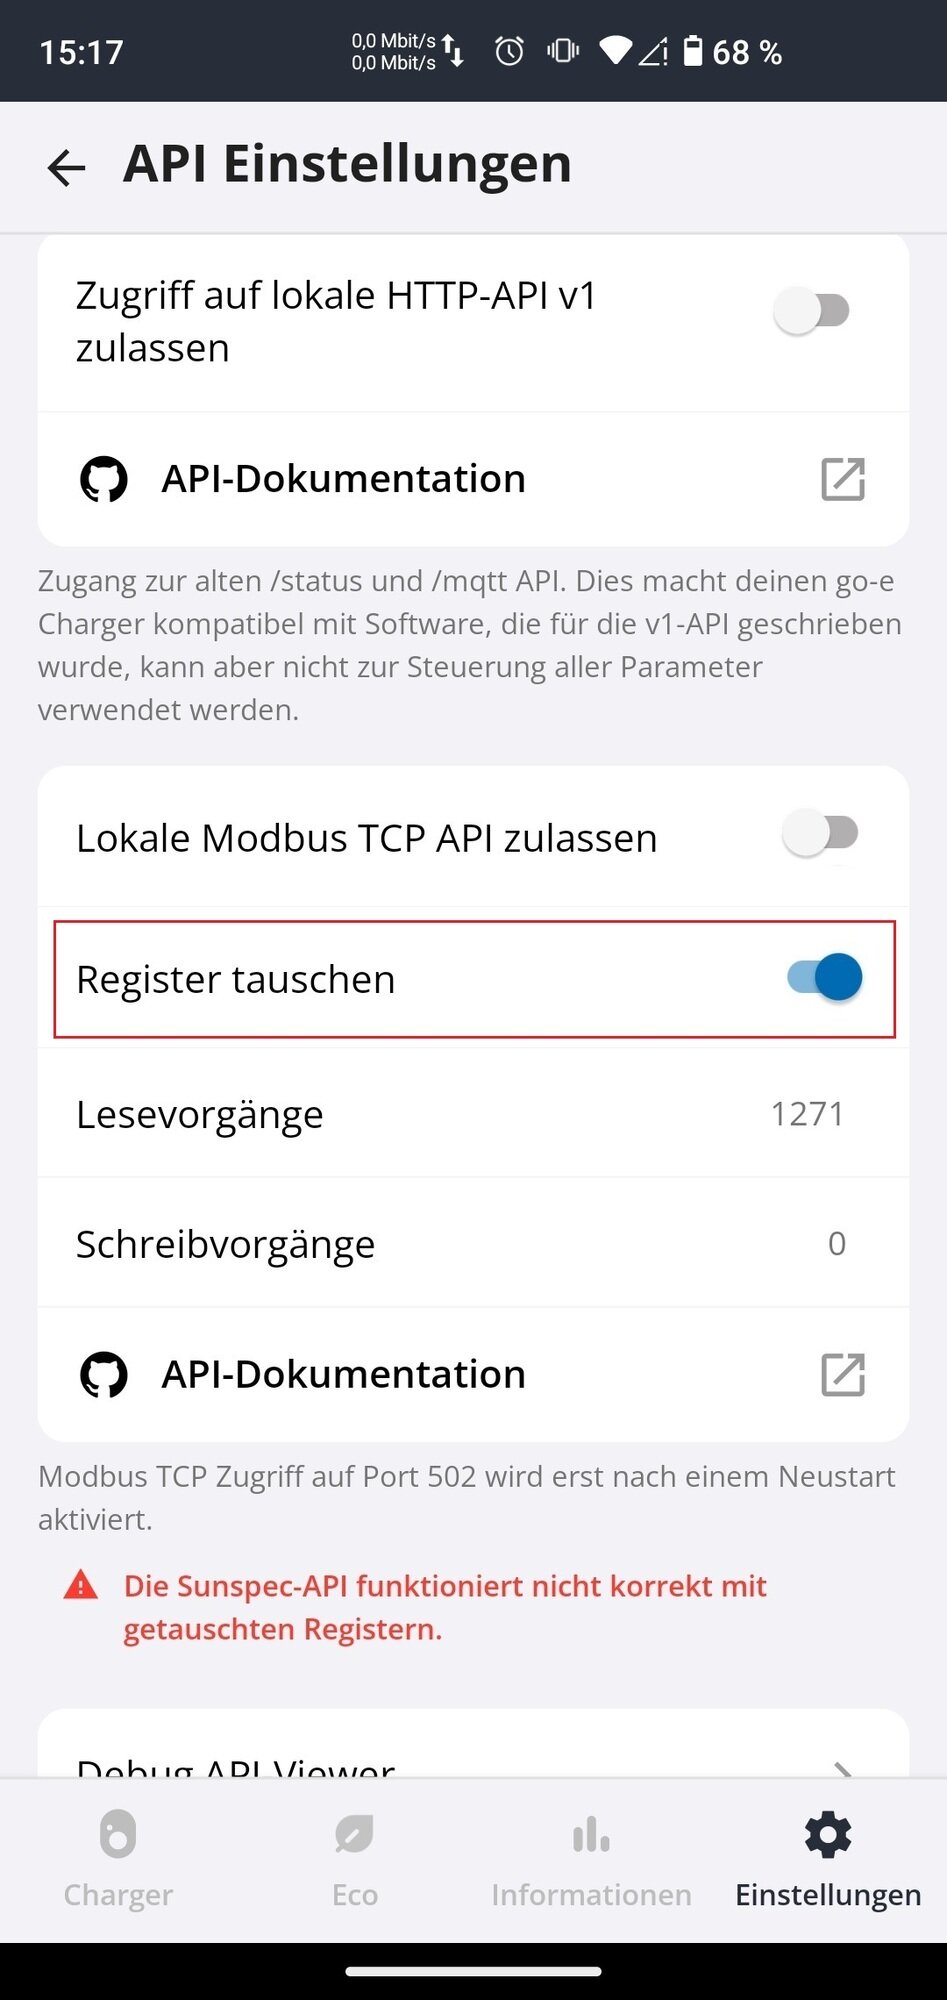
goe git 3
  1. Achtung, Register tauschen wird zeitgleich aktiviert. Scrollen Sie bitte zum Seitenende.

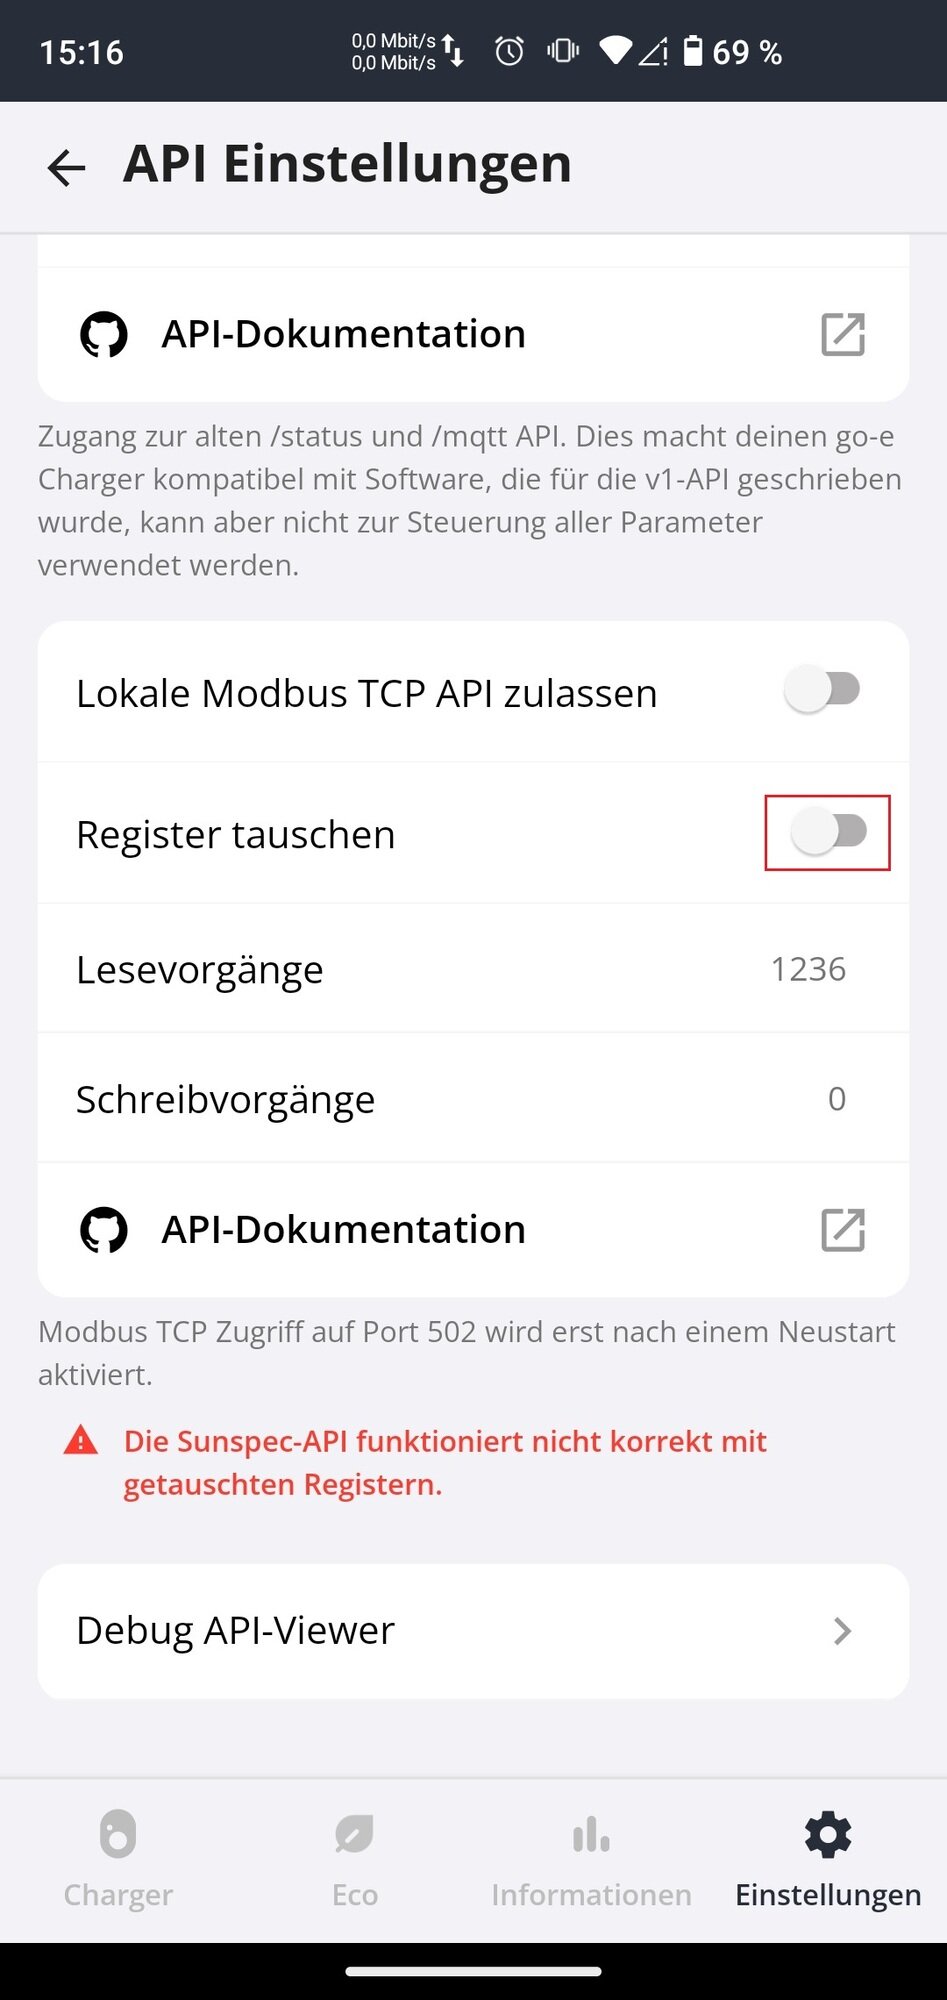
goe git 4
  1. Deaktivieren Sie Register tauschen.

Table 7. IP-Adresse über die go-e Home App auslesen
goe ip
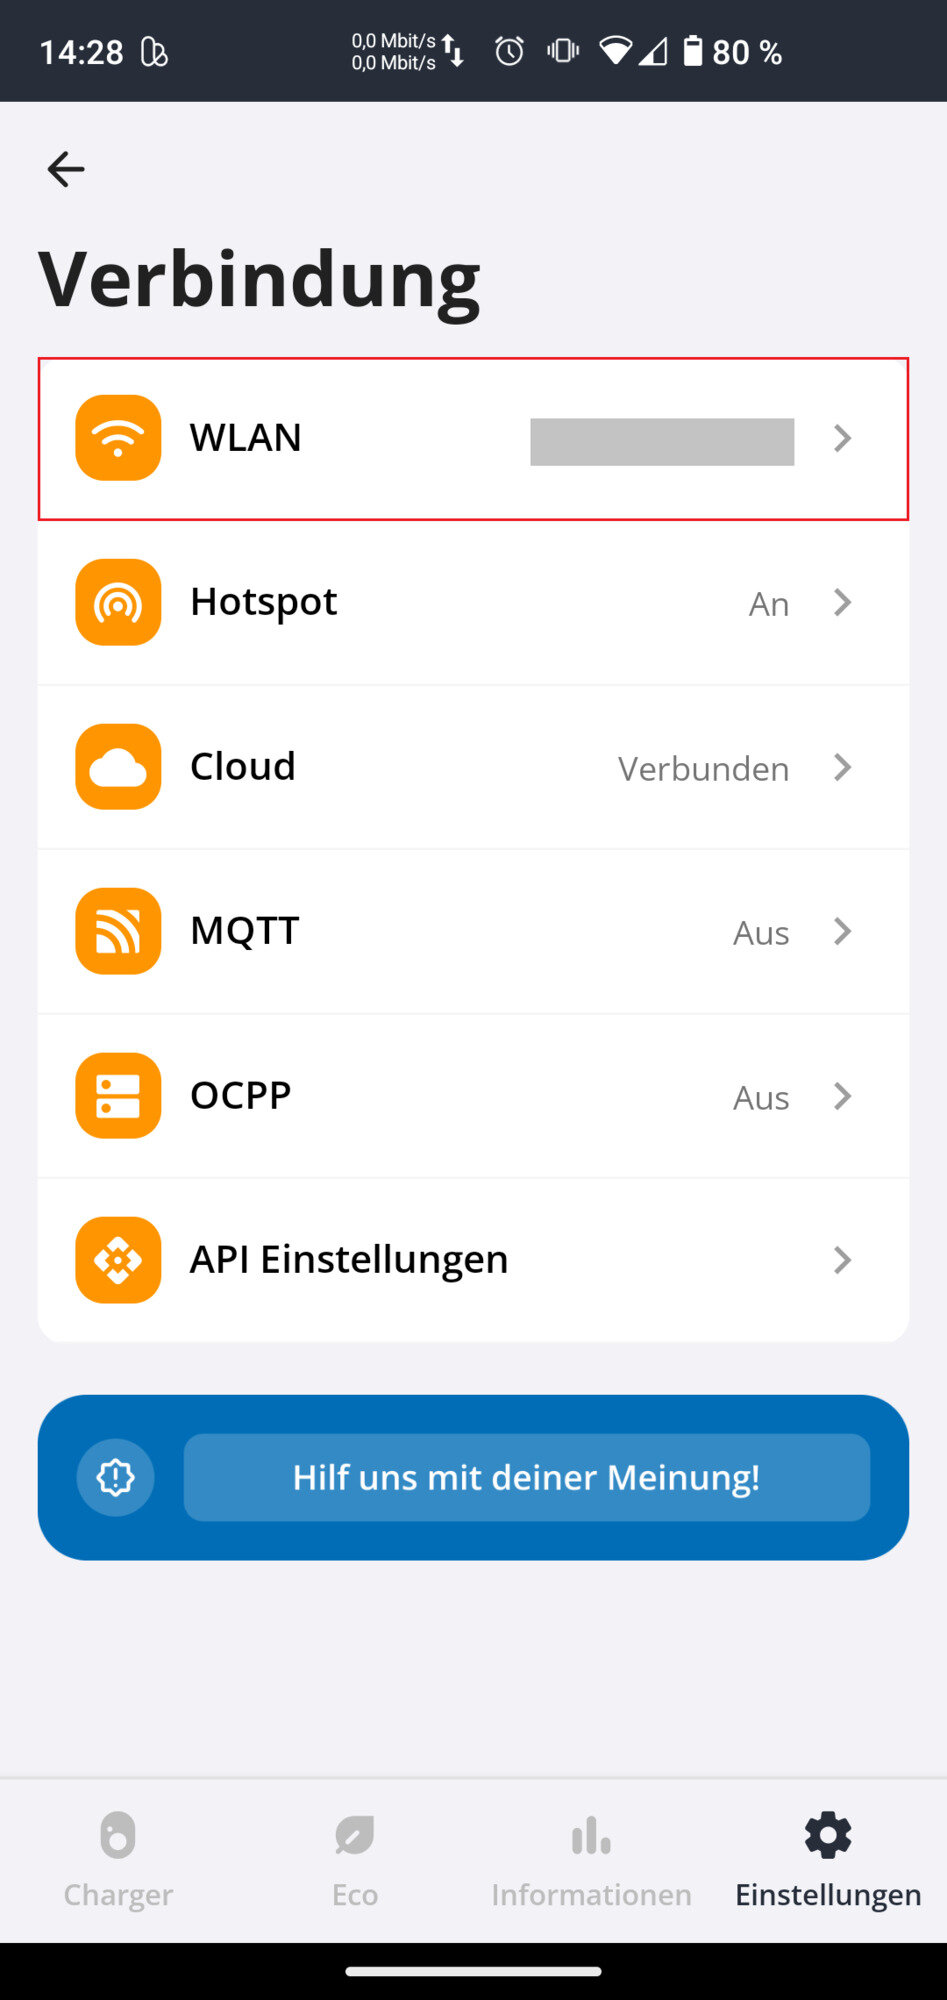
  1. Gehen Sie auf Einstellungen und wählen Sie den Reiter Verbindungen aus.

goe ip 2
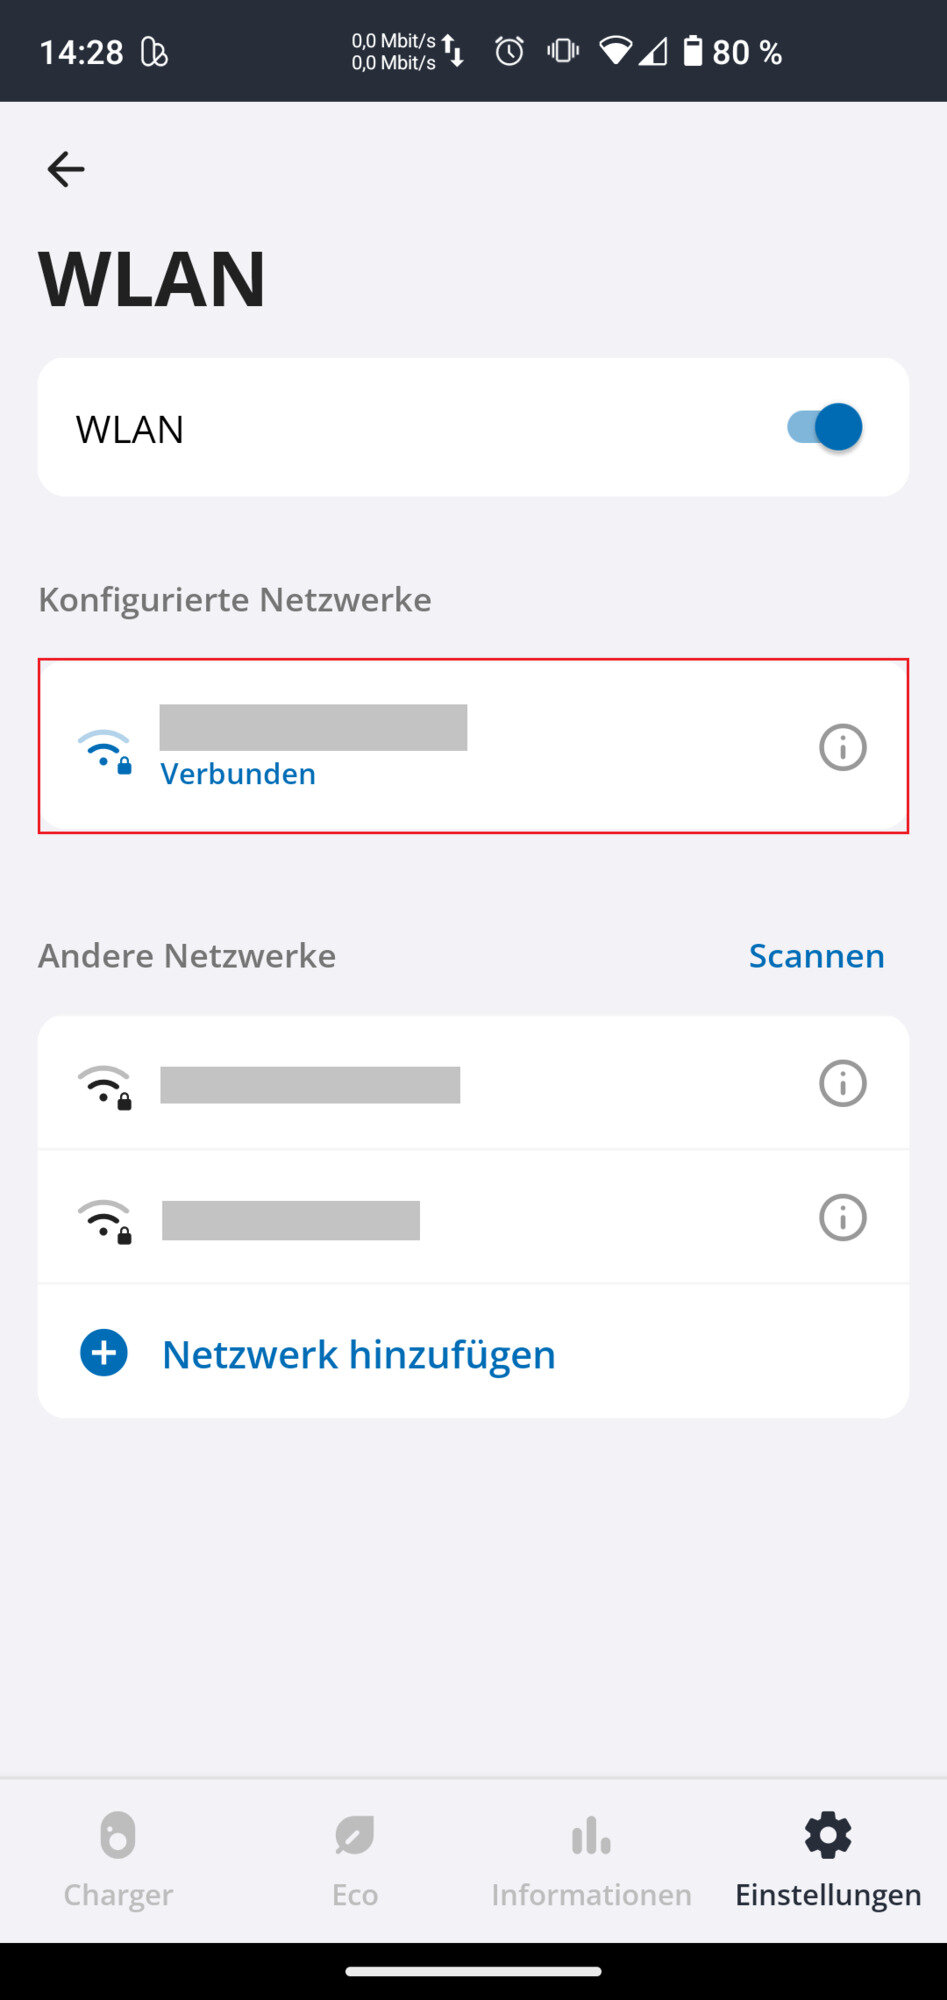
  1. Wählen Sie den Reiter "WLAN" aus.

goe ip 3
  1. Wählen Sie auf der "WLAN"-Einstellungsseite unter Konfigurierte Netzwerke den richtigen WLAN-Router aus.

goe ip 5
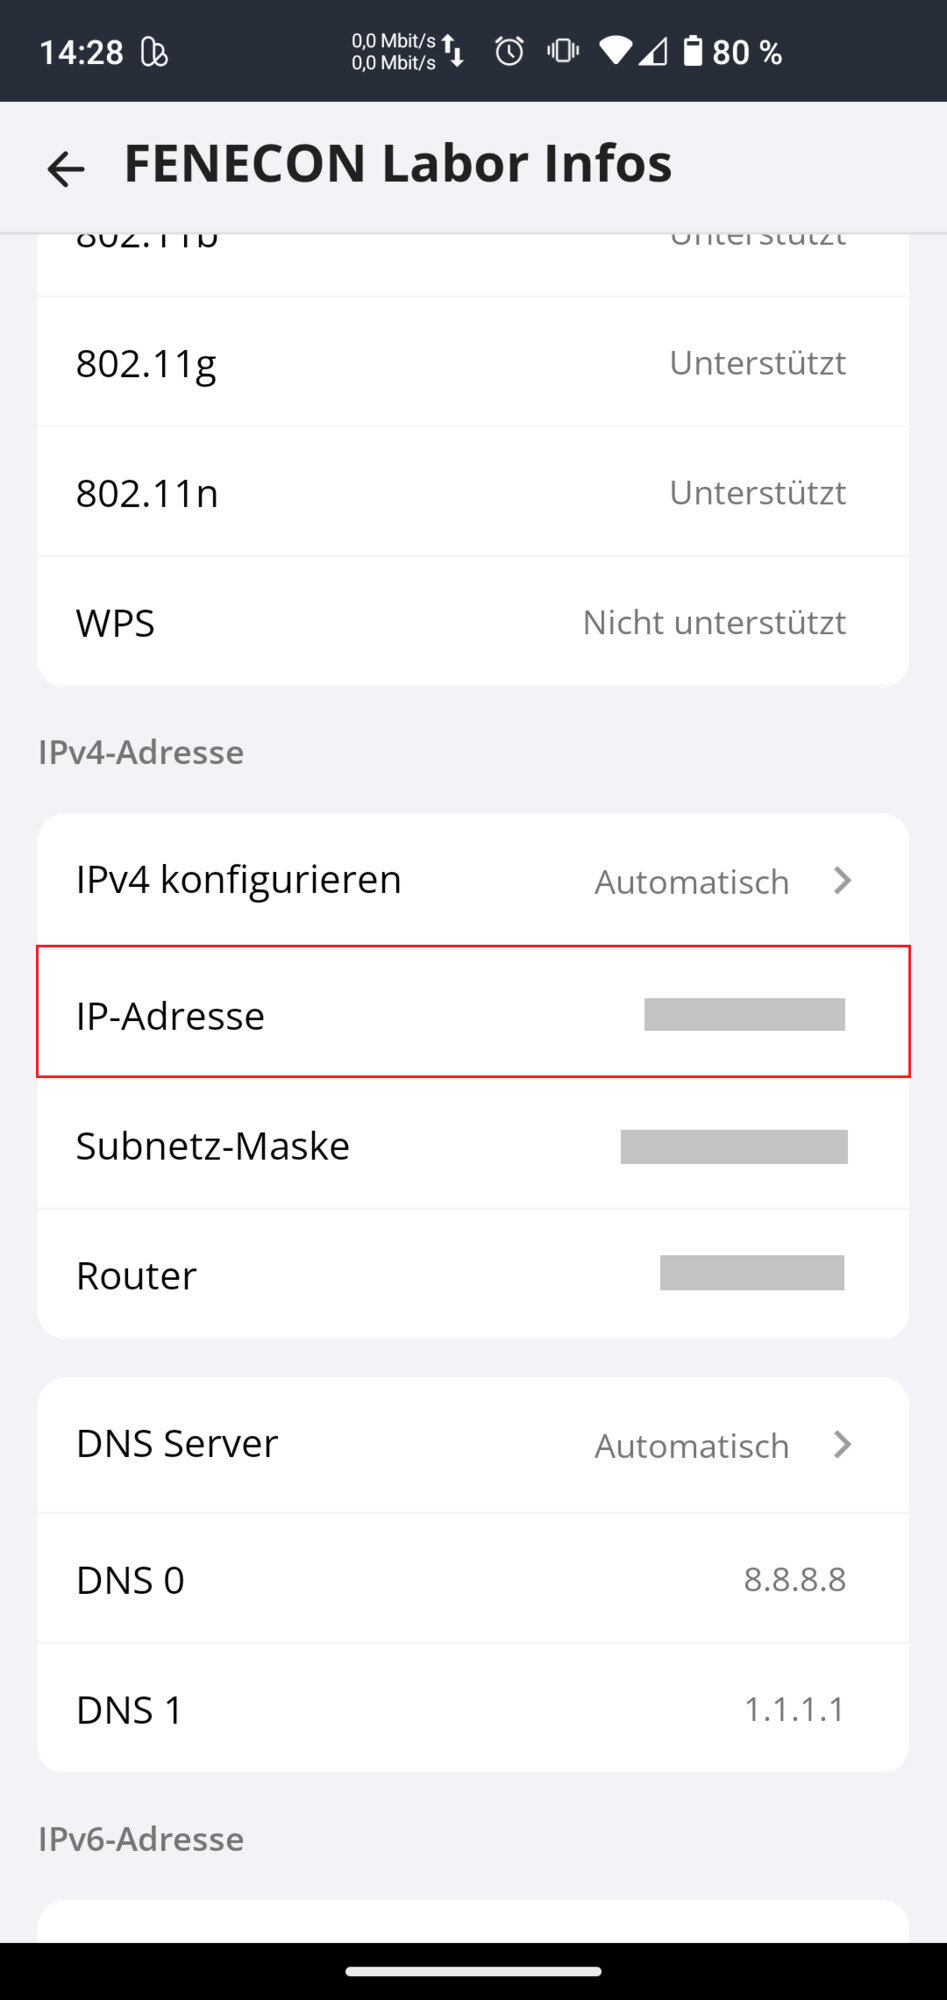
  1. Anschließend werden Ihnen alle eingerichteten Endgeräte (hier: go-e Charger Gemini flex) mit der jeweiligen IP-Adresse angezeigt.

Please make a note of the assigned IP address. The IP address is required below to set up the FEMS App go-e lesend.

3.4. Updating the charging station firmware

Um sicherzustellen, dass die neuesten Funktionen der Ladestation genutzt werden können, empfehlen wir, stets die neueste Firmware zu nutzen.

Ihnen werden automatisch beim Öffnen der go-e Home App die neuesten Software-Updates angezeigt.
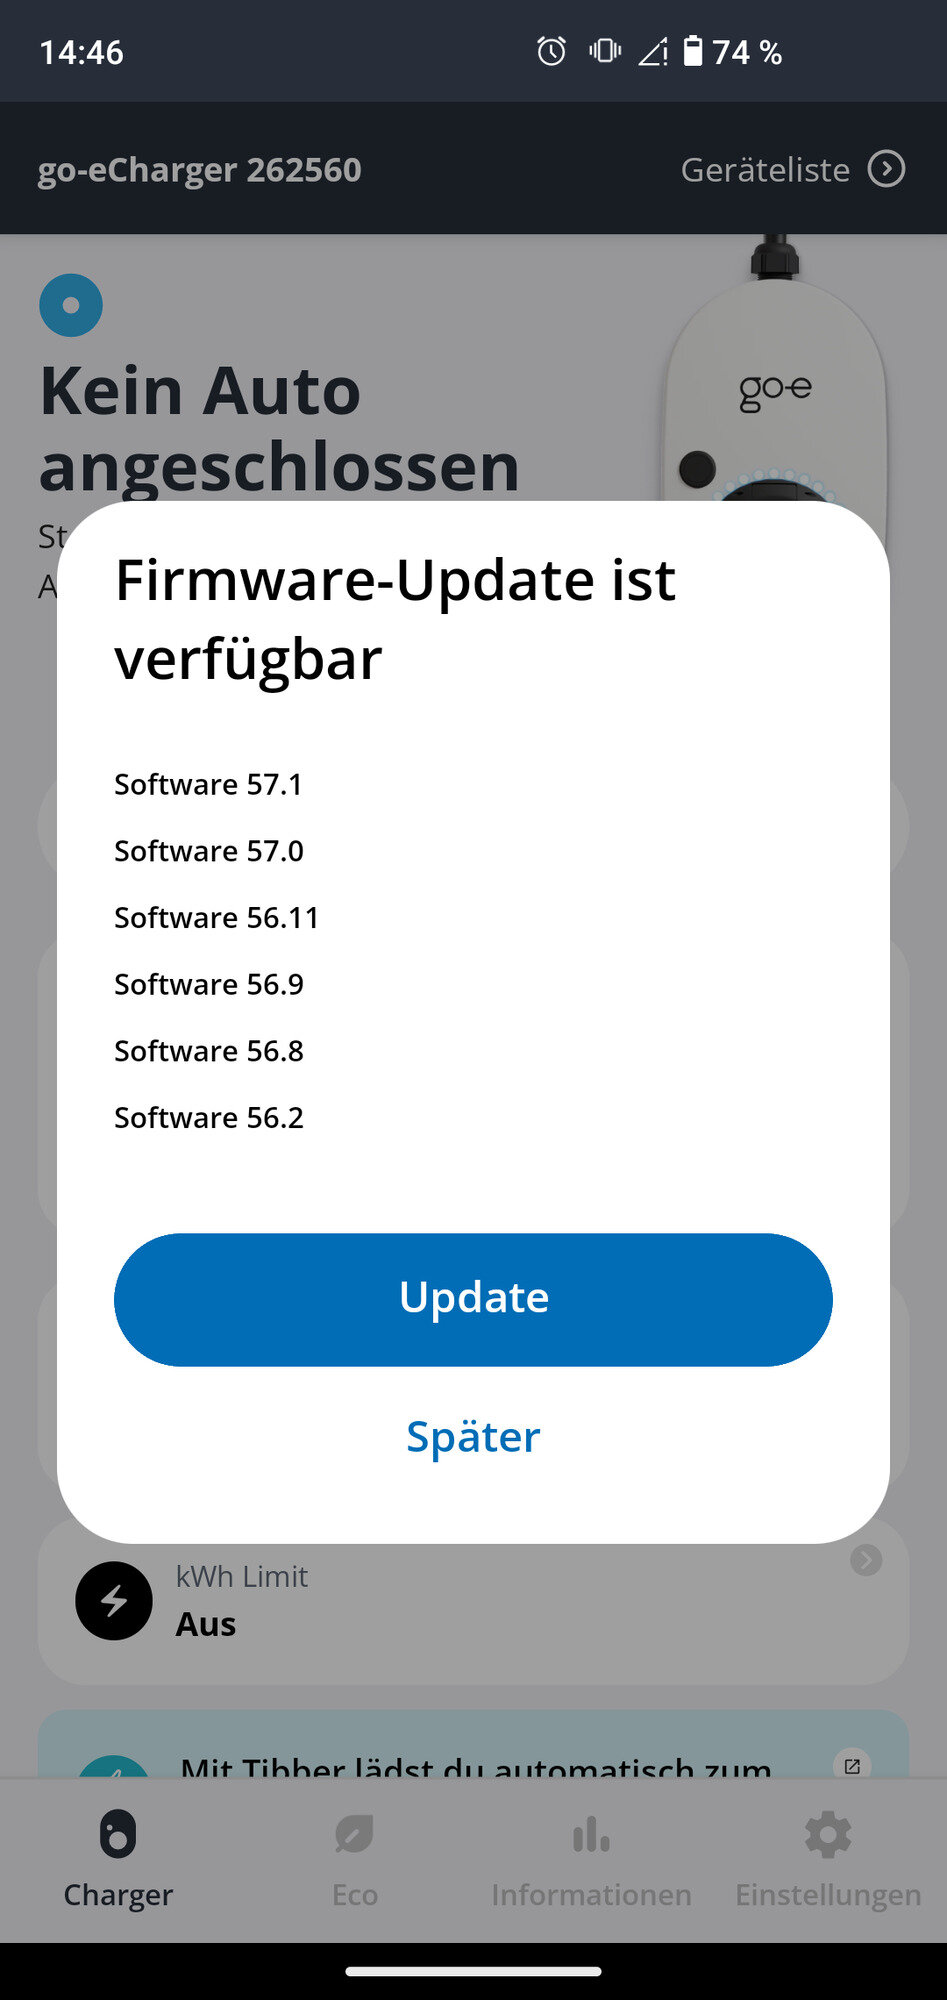
Table 8. Software update of the go-e Charger Gemini flex
goe update
  1. Klicken Sie im Pop-Up Aktualisierung verfügbar auf "Update".

The configuration is now complete.

4. Install FEMS App go-e lesend

Im FEMS App Center finden Sie alle installierbaren FEMS Apps — wie die FEMS App go-e lesend.

In dem Benutzerhandbuch FEMS App Center finden Sie eine ausführliche Anleitung zur Bedienung des FEMS App Center. Des Weiteren wird beschrieben, wie ein Lizenzschlüssel registriert und eingelöst werden kann.

Es gibt zwei Wege eine App über das FEMS App Center zu installieren. Nachstehend wird nur auf die [Direkte Installation] eingegangen, wobei ein Lizenzschlüssel in der FEMS registriert und eingelöst wird.

4.1. Direct Installation

To install the FEMS App go-e lesend directly, go to the overview of the FEMS App Center.

Only apps from the "Available" category can be installed.
fems app 1
Figure 1. App installation — Variant 2: Step 1

Select the FEMS App go-e lesend by clicking on it.

fems app 2
Figure 2. App installation — Variant 2: Step 2

You will then be taken to the app overview.

fems app 3
Figure 3. App installation — Variant 2: Step 3

Click on the "Install app" button.

fems app 4
Figure 4. App installation — Variant 2: Step 4

An input mask for redeeming a license key appears.

app center install 09
Figure 5. App installation — Variant 2: Step 5

You have two options here.

4.1.1. Redeem already registered license key

If you want to redeem an already registered license key, select it (1). Then click on the button of the same name to redeem the selected license key (2).

app center install 10
Figure 6. App installation — Variant 2: Step 5a

4.1.2. Redeeming a new license key

If you have not yet registered a license key or wish to redeem a new license key, enter the 16-digit key in the corresponding field (1) and then click on "Validate license key" (2). The entered license key is then checked for validity.

app center key 02
Figure 7. App installation — Variant 2: Step 5b

If the license key is valid, it can be redeemed by clicking on the button of the same name. If the license key is recognized as invalid, please check your entry and try again.

app center key 03
Figure 8. Redeeming a new license key: Step 6

You will then be taken to the installation wizard for FEMS App go-e lesend.

fems app 5
Figure 9. App installation — Variant 2: Step 7

Some of the input fields are pre-filled. Nevertheless, enter your data if it differs from the default values (e. g. IP address). Otherwise, the default values can be retained (e. g. port, Modbus unit ID).

Mandatory fields are marked with *
Check your entries and make sure that they are correct. Otherwise the respective app will not work properly!

Then click on "Install app".

fems app 7
Figure 10. App installation — Variant 2: Step 9

Once the installation process is complete, the new app appears in the overview of the FEMS App Center in the "Installed" category.

4.2. Edit FEMS app

Apps that have already been installed can be subsequently edited to change configuration settings. To do this, select the respective app in the FEMS App Center overview and click on the "Edit app" button. Detailed instructions are found in the user manual FEMS App Center.

The FEMS App go-e lesend has been successfully installed.