Configuration Manual — Fronius PV Inverter
1. Introduction
These instructions are used to configure the following Fronius PV inverters:
-
Fronius Symo GEN24 3.0 - 10.0 kW
-
Fronius Symo 3.0 - 20.0 kW
| The Light version of the Fronius Symo is explicitly not supported, as it does not have a dedicated communication module. The integration of the Fronius Symo GEN24 (Plus) is limited to the pure function as a PV inverter. |
| The latest firmware should always be installed. |
2. Configuration — Fronius Symo GEN24
| Bevor Sie den PV-Wechselrichter konfigurieren, stellen Sie sicher, dass dieser ordnungsgemäß installiert wurde. Nutzen Sie hierfür die Installationsanleitung des Herstellers: Installations-Guide — Fronius GEN24 & GEN24 Plus |
To integrate into the FEMS, configure the device via the web interface. You can access this by calling up the IP address of the inverter in the browser. We recommend setting the assignment of the IP address to "Automatic" when commissioning the device.
| To be able to access the web interface, your PC/notebook/smartphone must be in the same network as the inverter. |
2.1. IP address
The connection between FEMS and the PV inverter is always established via the customer network. For this purpose, the IP address of the PV inverter is stored statically in FEMS. It is therefore necessary that the IP address of the PV inverter never changes.
-
Variant 1: Configure the inverter according to the instructions so that it is assigned a static IP address.
-
Communication → Network
-
Network → LAN
-
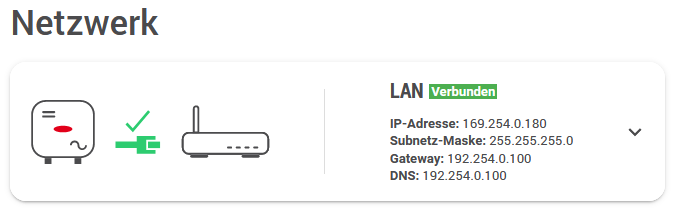
LAN → IP address: Set a free IP address in the address range of the router (default:
169.254.0.180) -
LAN → Subnet mask: Set the subnet mask used in the network (default:
255.255.255.0) -
LAN → Gateway: Set the IP address of the router as the gateway.
-
-
Variante 2: Konfigurieren Sie den Wechselrichter gemäß Anleitung so, dass diesem eine dynamische/automatische IP-Adresse zugewiesen wird.Konfigurieren Sie zusätzlich den DHCP-Server im Kundennetzwerk (z. B. AVM FritzBox ), sodass dem Wechselrichter immer die gleiche IP-Adresse zugewiesen wird.
-
Communication → Network
-
Network → LAN
-
LAN → Select the Automatic option
-
Then click on Connect. The inverter should now be connected via LAN, see figure [fig4:LAN-connected].
2.2. Ping test
To test the correct configuration of the IP address, we recommend pinging the inverter in the local customer network.
In the example below, the IP address 192.168.188.40 was set for the inverter in the configuration.
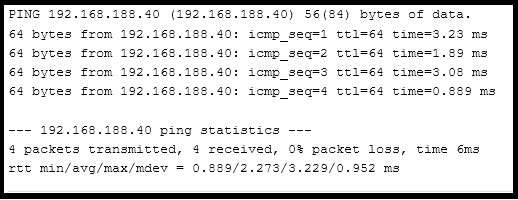
If the inverter cannot be reached via ping, check the settings under IP address.
2.3. Modbus
| Technician login is required to adjust the Modbus settings. Take the access data from your invoice or contact Fronius Support with your PIN and device number. They will then send you an activation code with which you can reassign the password. |
Make the following settings according to the instructions:
-
Communication → Modbus
-
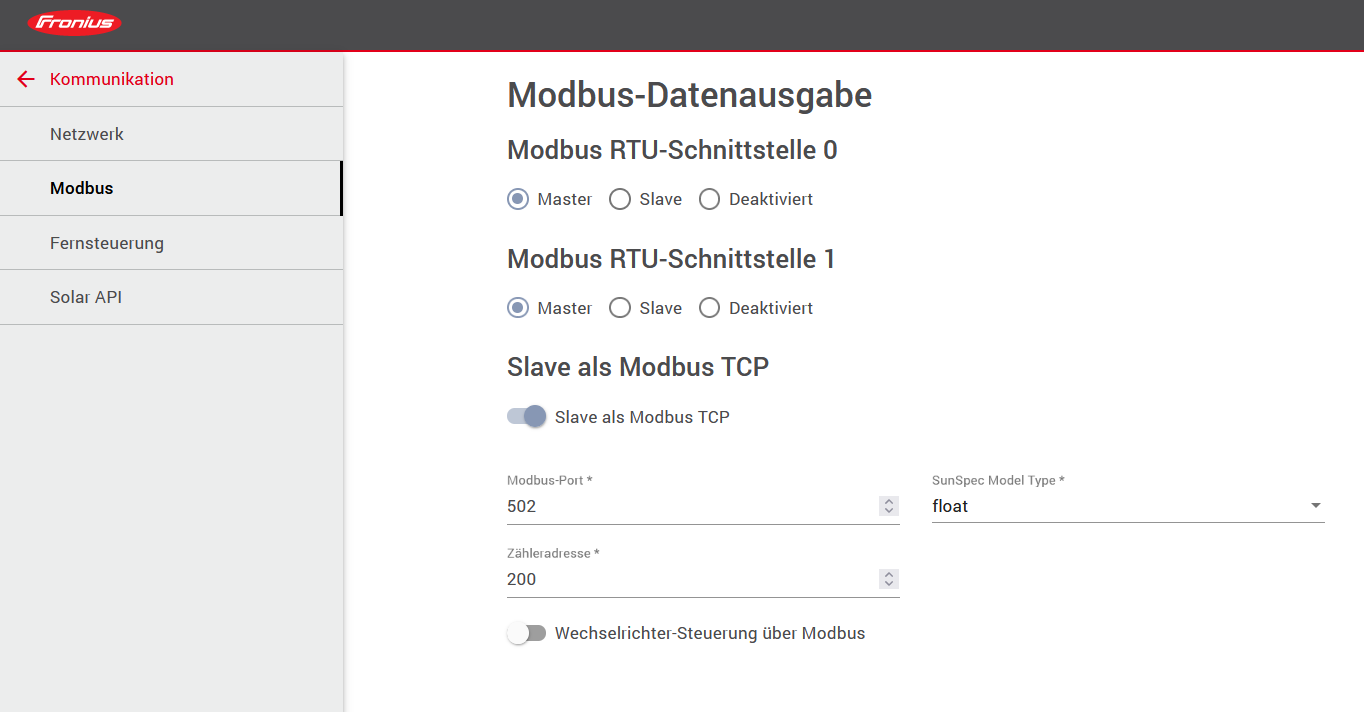
Modbus → Activate Slave as Modbus TCP option
-
Modbus port → Set the value 502 (default setting)
-
SunSpec Model Type → Set float (default setting)
-
Counter address → Set 200 (default setting)
-
Inverter control via Modbus → Deactivate (default setting)
The configuration has now been successfully completed. The settings should now look like Figure Modbus settings:
3. Configuration - Fronius Symo
| Bevor Sie den PV-Wechselrichter konfigurieren, stellen Sie sicher, dass dieser ordnungsgemäß installiert wurde. Nutzen Sie hierfür die Installationsanleitung des Herstellers: Installations Guide — Fronius Symo |
To integrate into the FEMS, configure the device via the web interface. You can access this by calling up the IP address of the inverter in the browser. We recommend setting the assignment of the IP address to "Automatic" when commissioning the device.
| To be able to access the web interface, your PC/notebook/smartphone must be in the same network as the inverter. |
3.1. IP address
The connection between FEMS and the PV inverter is always established via the customer network. For this purpose, the IP address of the PV inverter is stored statically in FEMS. It is therefore necessary that the IP address of the PV inverter never changes.
-
Variant 1: Configure the inverter according to the instructions so that it is assigned a static IP address.
-
Settings → Network
-
Network → Select the setting Internet via LAN under Connection mode.
-
Adjust the following settings under LAN settings
-
Obtain address → Static
-
Hostname → freely selectable (e. g. "PV")
-
IP address → Set a free IP address in the address range of the router (default:
169.254.0.180) -
Subnet mask → Set the subnet mask used in the network (default:
255.255.255.0) -
Gateway → Set the IP address of the router as the gateway.
-
DNS server → Set the IP address of the router as the DNS server.
-
-
Variante 2: Konfigurieren Sie den Wechselrichter gemäß Anleitung so, dass diesem eine dynamische/automatische IP-Adresse zugewiesen wird.Konfigurieren Sie zusätzlich den DHCP-Server im Kundennetzwerk (z. B. AVM FritzBox ), sodass dem Wechselrichter immer die gleiche IP-Adresse zugewiesen wird.
-
Settings → Network
-
Network → Select the setting Internet via LAN under Connection mode.
-
Adjust the following settings under LAN settings
-
Obtain address → dynamic
-
3.2. Ping test
To test the correct configuration of the IP address, we recommend pinging the inverter in the local customer network.
In the example below, the IP address 192.168.188.40 was set for the inverter in the configuration.
If the inverter cannot be reached via ping, check the settings under IP address.
3.3. Modbus
| Admin login is required to adjust the Modbus settings. Take the access data from your invoice or contact Fronius Support with your PIN and device number. They will then send you an activation code with which you can reassign the password. |
Make the following settings according to the instructions:
-
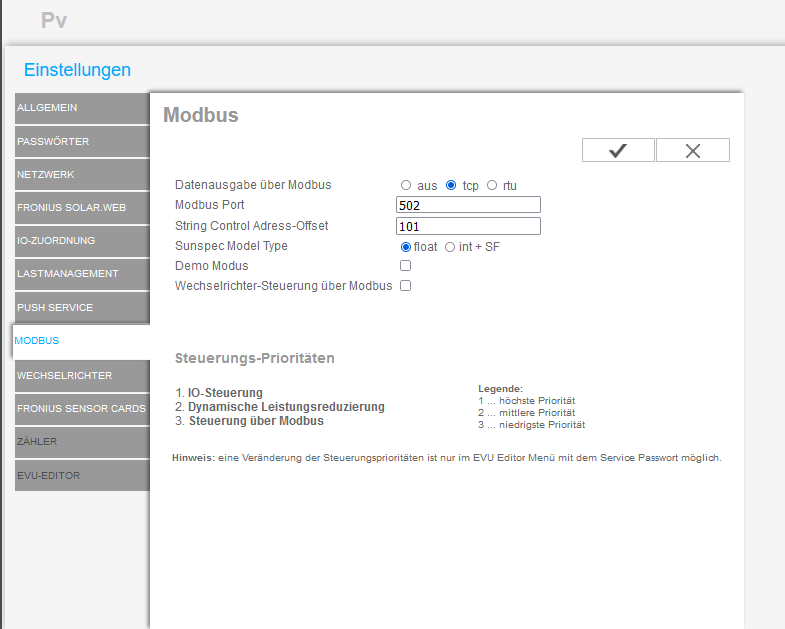
Modbus → Activate the option tcp under Data output via Modbus
-
Modbus port → Set the value 502 (default setting)
-
String Control Address Offset → Set the value 101 (default setting)
-
Sunspec Model Type → Set float (default setting)
-
The Demo mode and Inverter control via Modbus do not need to be activated
The settings should now look like Figure Modbus settings:
3.4. Night mode
By default, the Fronius Symo does not record any data during the night. This means that no measurement data is recorded in Online Monitoring either. We therefore recommend activating logging during the night (see Settings - Night mode)
The settings can be found under: Settings → Fronius Solar.Web
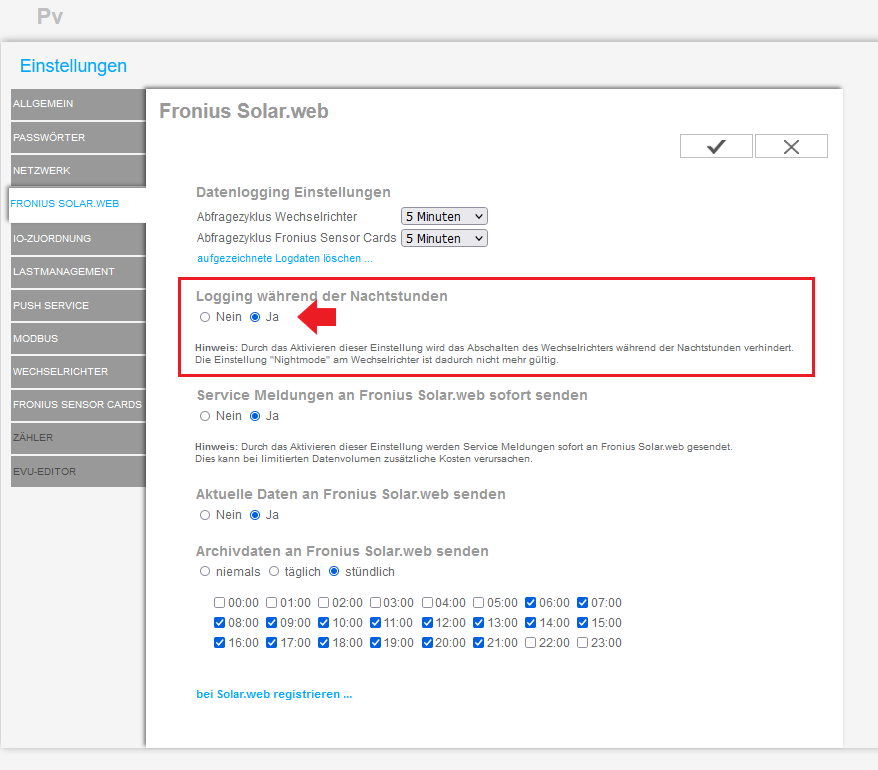
Activate logging during the night hours here.
The configuration has now been successfully completed.