Installation and Configuration Manual — Alpitronic Hypercharger
1. Introduction
These instructions are for configuring the following Alpitronic Hypercharger charging stations:
1.1. Legal provisions
The information contained in these documents is the property of FENECON GmbH. Publication, in whole or in part, requires the written consent of FENECON GmbH.
Subject to changes and printing errors!
1.2. Qualification of the installing electrician
A qualified electrician is a person who has the necessary experience and training:
-
Setting up, switching on, switching off, disconnecting, short-circuiting and repairing circuits and devices
-
Standard maintenance and use of protective devices in accordance with current safety standards
-
First aid/emergency care
-
Current knowledge of local regulations, standards and guidelines
1.3. Symbols used
Before reading the manual, you should familiarize yourself with the different types of safety warnings. You should also familiarize yourself with the importance of the safety warnings.
1.4. Symbol conventions
|
||
|
||
|
||
|
3. Commissioning
Please follow the instructions in the "Operating and installation instructions hardware part Hypercharger HYC150/HYC300" to install the Alpitronic Hypercharger 150/300 charging station. |
|
This quick guide refers to the original user manuals. |
4. Configuration
4.1. Ethernet connection
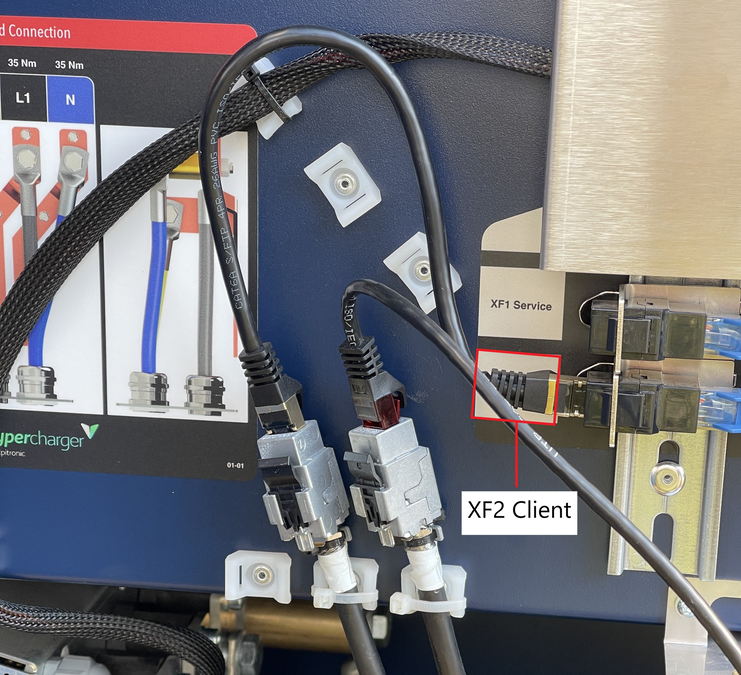
After the electrical installation of the charging station, it must be connected to the customer network via the network interface (LAN) XF2 of the KF5 CRTL EXT control board.
4.2. Access to the web interface
The FEMS is configured by default to try to reach the charging station at the static IP address 192.168.1.100.
To reach the charging station from your notebook/PC, it is necessary to set up a static IP address in the same subnet (e. g. 192.168.1.99) in the network adapter settings.
-
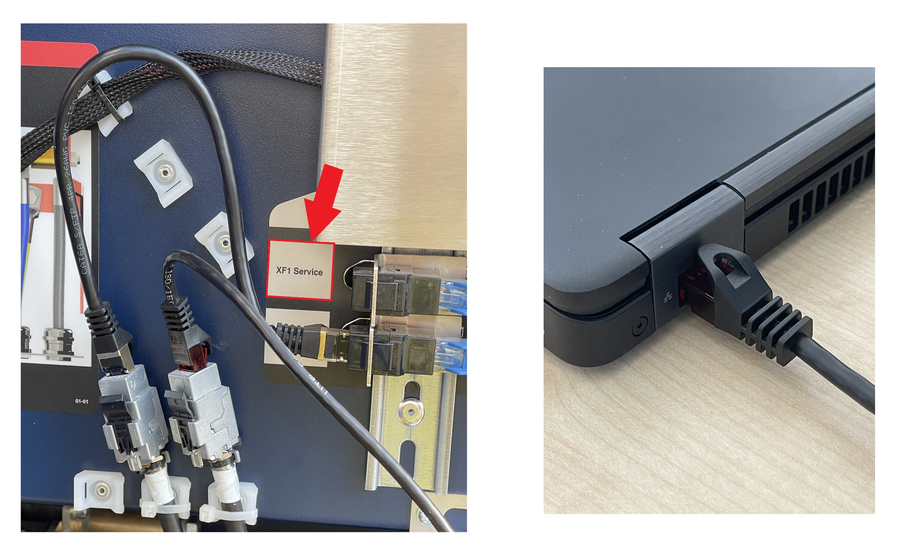
Connect the KF5-CRTL-EXT control board to your device (here: notebook) via the RJ45 socket XF1, as shown below, to achieve this.
-
Open your web browser to access the web interface. Enter the following IP address:
191.168.1.100to do this
If problems occur in step 2, proceed as follows:
-
Open the "Network and Sharing Center" in the system settings of your PC.
-
Click on LAN connection.

-
In the new window that opens, click on Properties.
-
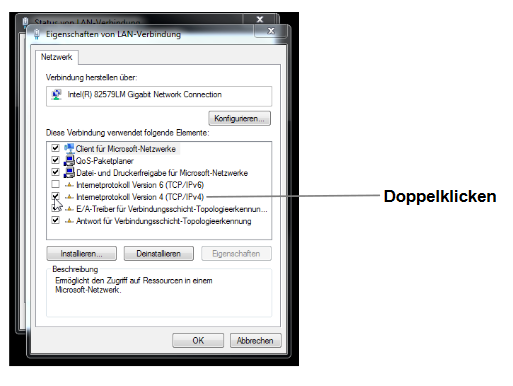
Double-click on "Internet Protocol Version 4 (TCP/IPv4)" in the new window (cf. graphic).
Alternatively, select "Internet Protocol Version 4 (TCP/IPv4)" in the open window and then click on "Properties".
-
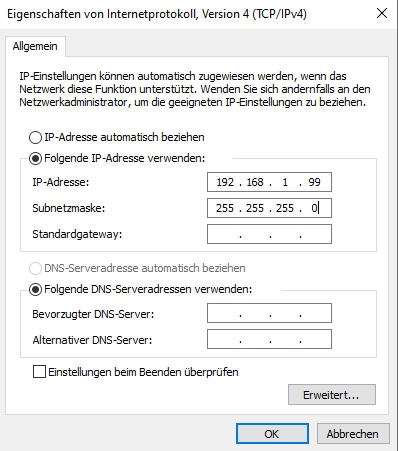
In the next window, select "Use the following IP address" to enter the IP address:
192.168.1.99and the subnet mask:255.255.255.0as shown in the picture below. The entries for the DNS server can be left blank.
-
Confirm the entries.
The charging station can then be configured via the web interface. To do this, enter the IP address of the charging station (192.168.1.100) in the address bar of the browser.
You will be prompted to enter your user name and password. Enter the default values here:
User name: admin
Password: admin123
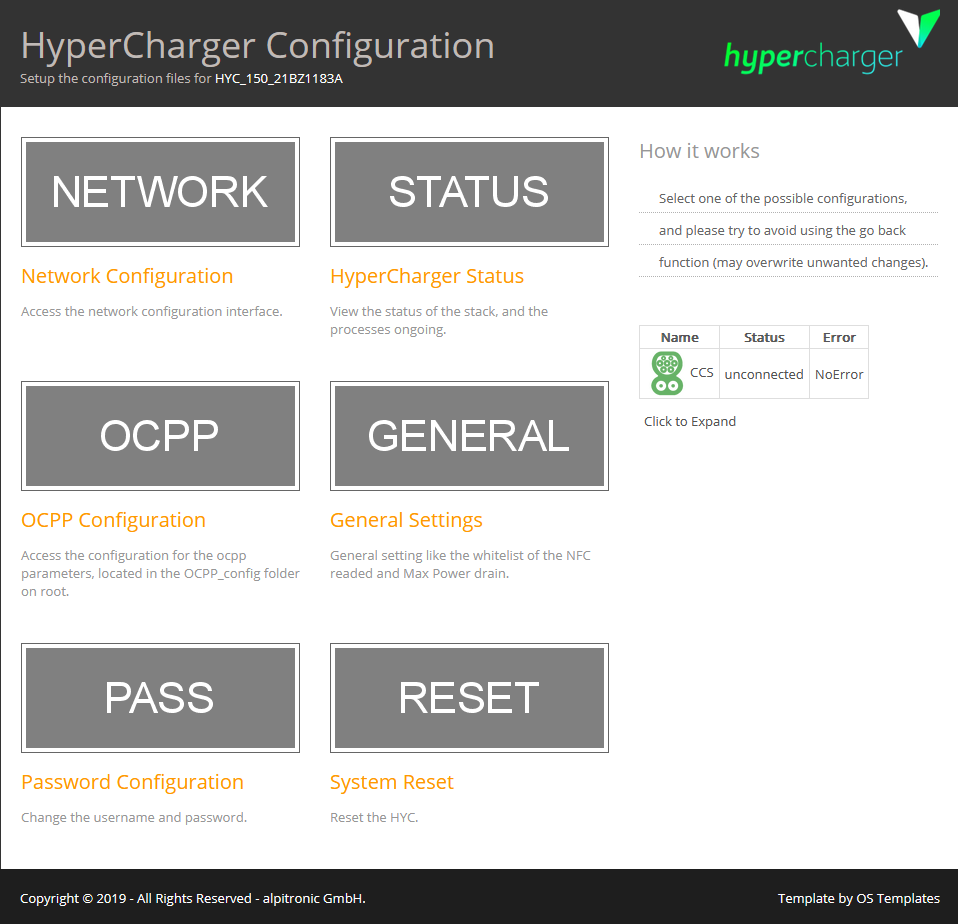
You will then be taken to the overview of the web interface as shown below.
|
We recommend that you change your user name and password after the first use. Use the "Password Configuration" button to do this |
4.3. Configuration web interface
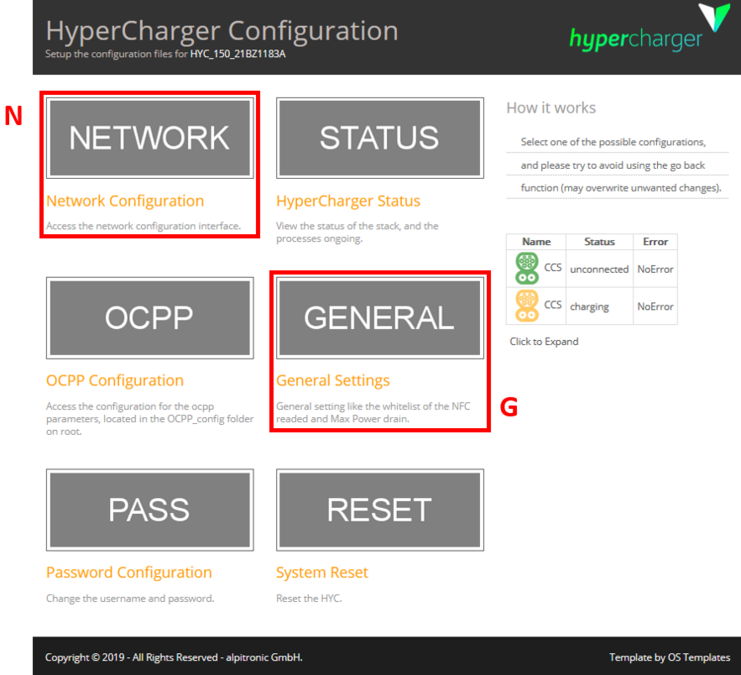
Only the "GENERAL" (G) and "NETWORK" (N) buttons are relevant for configuring the Hypercharger. All other settings should remain unchanged to ensure functionality.
4.4. General settings (GENERAL)
4.4.1. Power settings
-
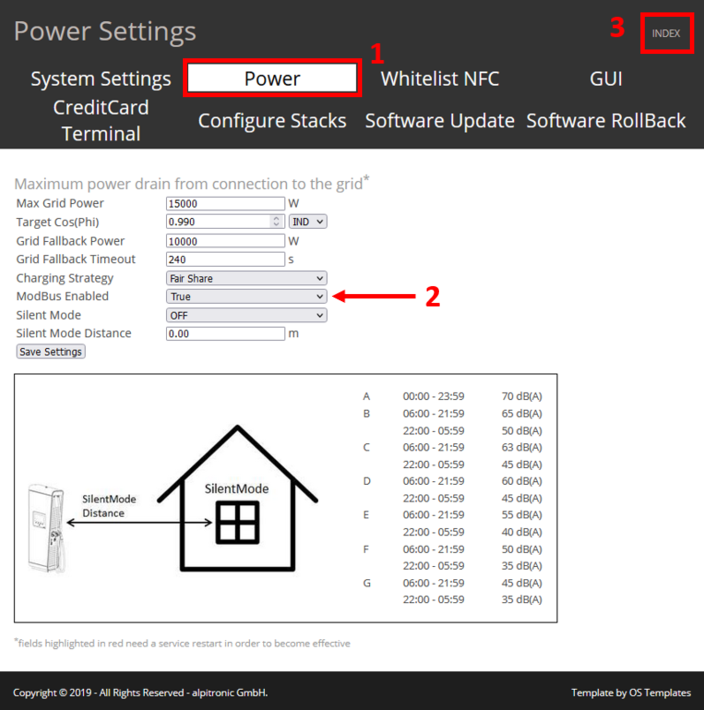
Under the "Power" button (1), set the "ModBus Enabled" setting (2) to "True" to enable communication between the charging station and the FEMS.
The following settings can be configured here, among others:
-
Silent Mode_: When "Silent Mode" is activated, the Hypercharger reduces the charging power to reduce sound emissions.
-
Grid Fallback Power: Maximum grid fallback power of the charging station as soon as the connection to load management is interrupted.
|
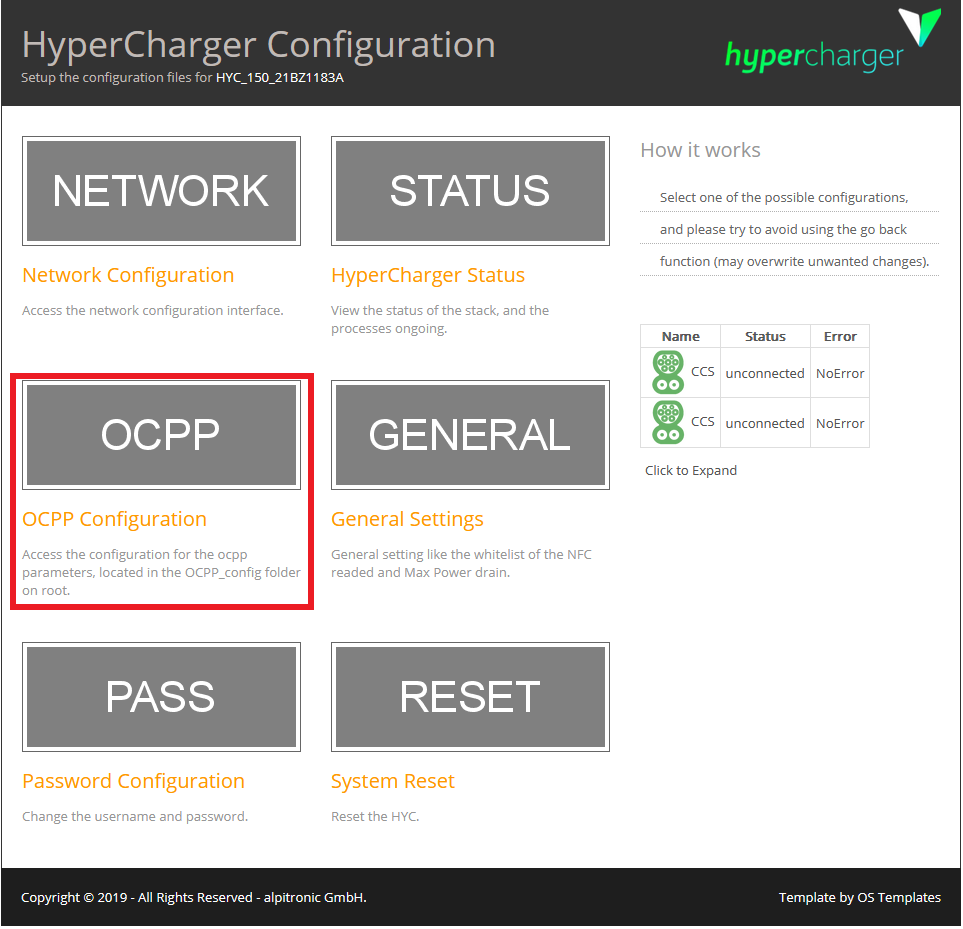
If Grid Fallback Power is configured, this must also be done in the "OCCP Configuration" interface. |
You can access this via the button of the same name, as shown below:
Scroll down to the "Power settings", as shown in the illustration below:
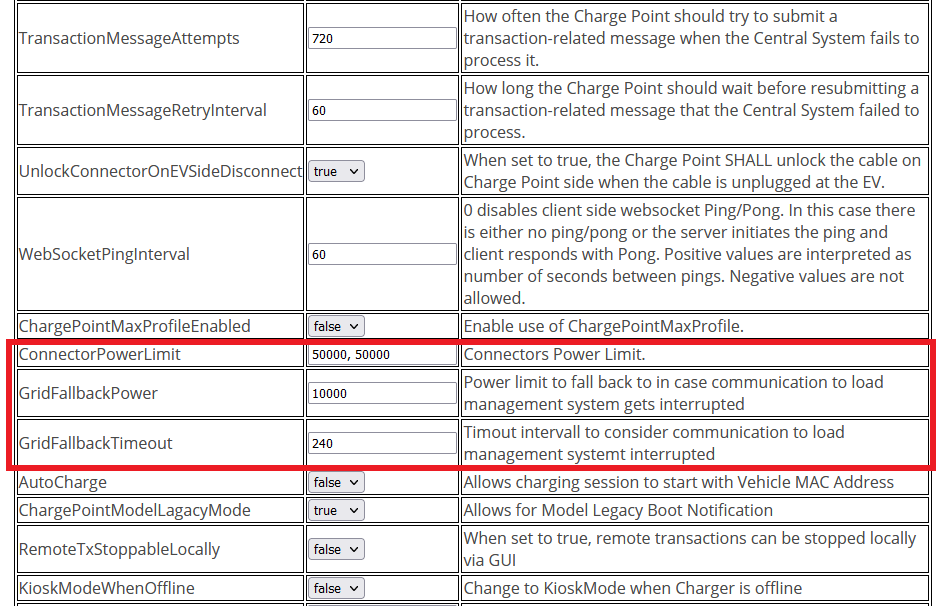
Adjust the corresponding entries according to the settings made under "Power".
-
ConnectorPowerLimit: Max. Charging power per charging point, e. g. 50000, 50000 to limit the maximum charging power of both charging points to 50 kW each.
-
GridFallbackPower_: Max. Charging power as fallback value as soon as the connection to the load management is interrupted, e. g. 10000 to limit the maximum charging power to 10 kW.
Use the "INDEX" button (3) to return to the overview of the web interface.
4.4.2. Settings with restart
|
Input fields colored red (see figure below) always require a restart of the charging station. |
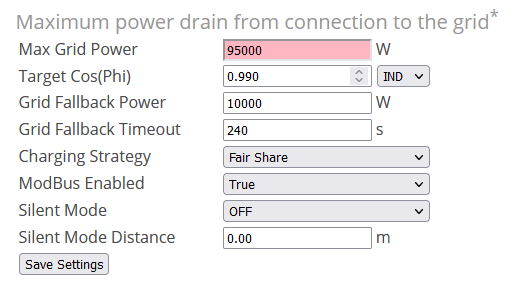
Proceed as follows:
-
Save the entries using the "Save Settings" button.
-
Use the "INDEX" button to return to the web interface overview.
-
Click on the "RESET" button as shown below.
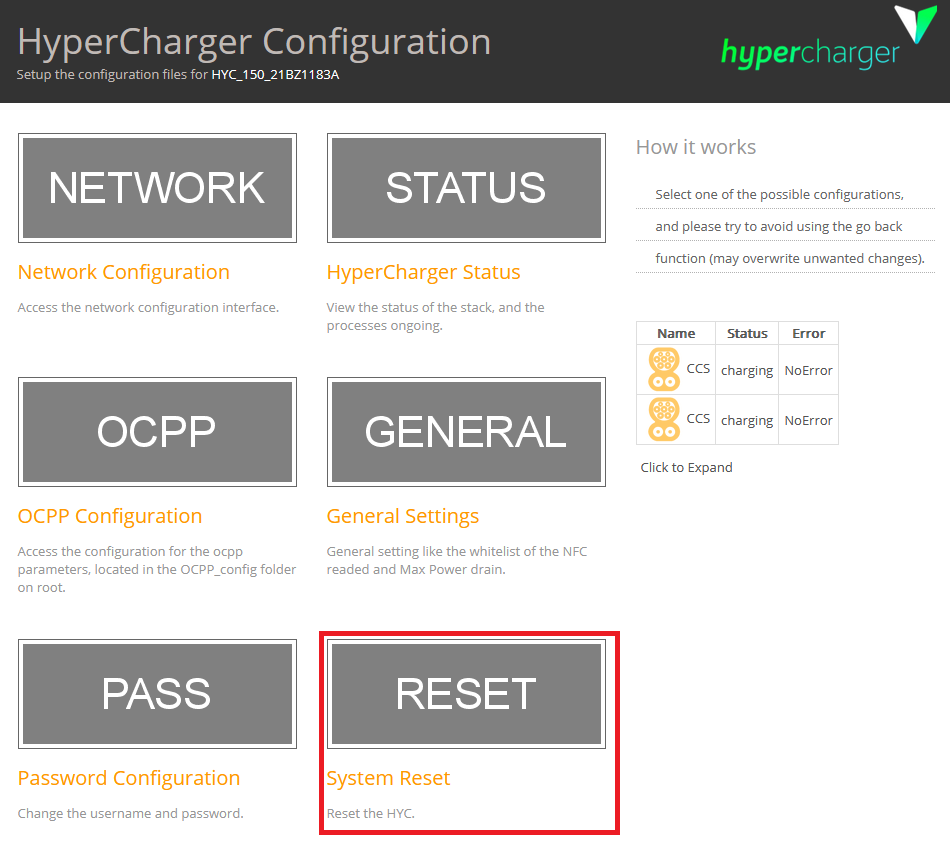
-
Click on the "Hard Reset HYC" button to restart the charging station, as shown in the illustration below:
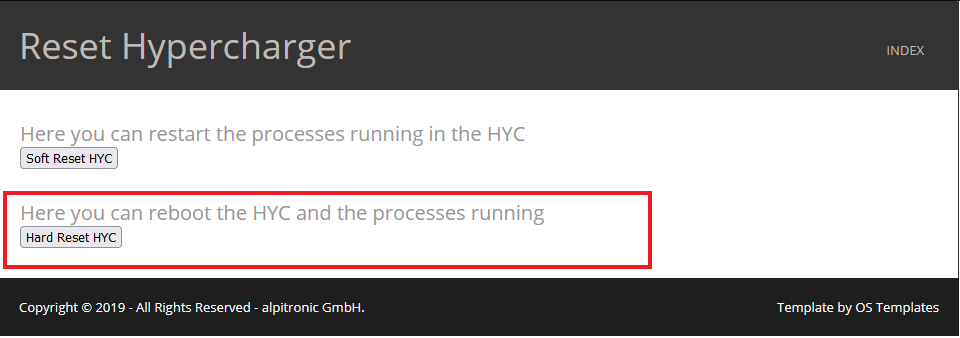
-
Wait until the charging station has restarted and is accessible again.
-
Check whether the settings you have made have been accepted.
4.4.3. Software update
We recommend always using the latest firmware to ensure that all the latest functions of the charging station can be used.
Firmware updates can be obtained and downloaded from the manufacturer’s website https://account.hypercharger.it/login [here].
|
An account is required to download firmware updates. |
Save the downloaded firmware on your device (e. g. notebook).
New firmware updates can be uploaded using the "Software update" button (1).
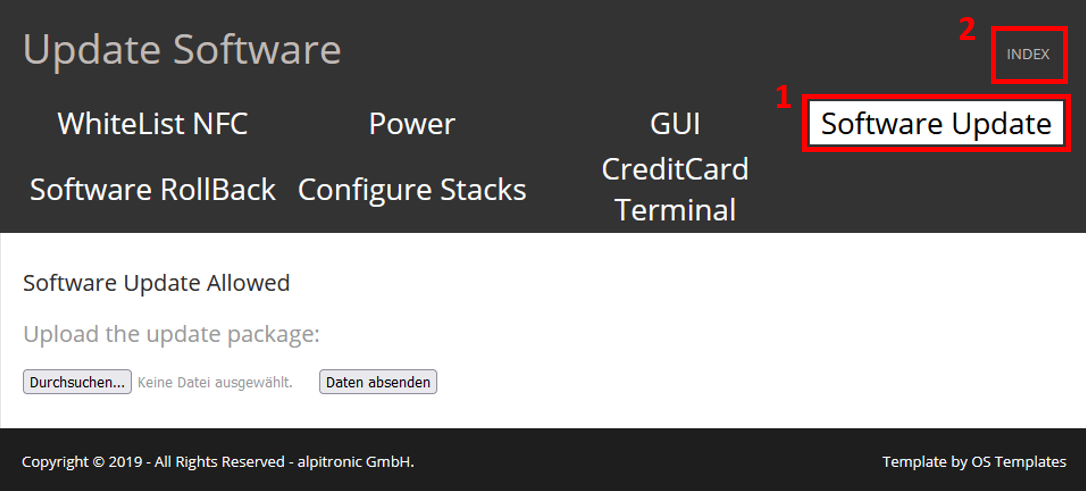
Proceed as follows:
-
Call up the Software Update tab
-
Select previously downloaded firmware file with Browse….
-
Click on Send data
Use the "INDEX" button (2) to return to the overview of the web interface.
4.5. Network settings (NETWORK)
The charging station is preconfigured at the factory with the IP address: 192.168.1.100, as shown in the graphic below under the "Ethernet Configuration" tab:
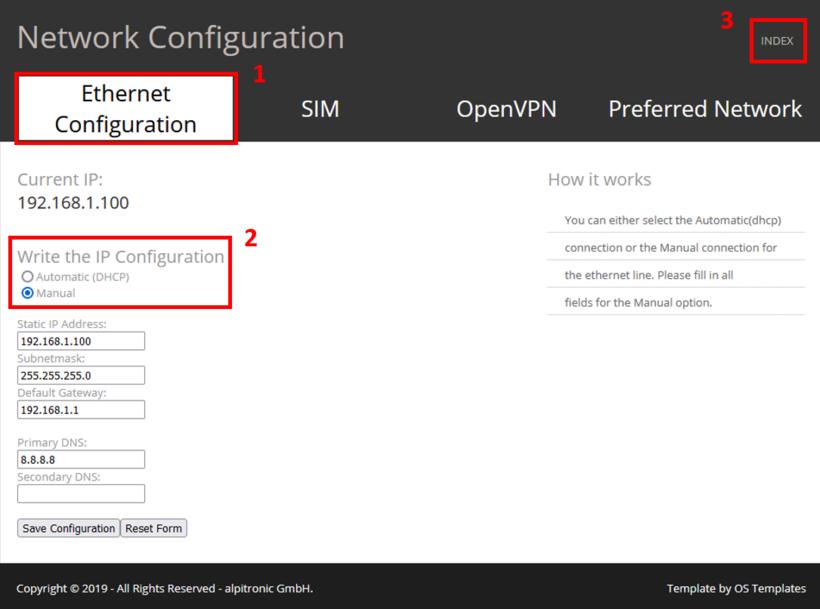
If several Hyperchargers are operated in a network, the "Write the IP Configuration" item (2) must be set to "Automatic (DHCP)". This assigns a dynamic IP address to the Hypercharger. This IP address must be determined in the DHCP server, e. g. the router, or via a network scan. It will be needed later to install the FEMS app. From now on, the Hypercharger’s web interface can be accessed under the newly assigned IP address.
Use the "INDEX" button (3) to return to the overview of the web interface.
|
Remember to remove the static default after completing the configuration. Otherwise, Online Monitoring will not be accessible and connection problems to the internet may occur. |
To do this, reset the settings to "Obtain IP address automatically", as illustrated below:
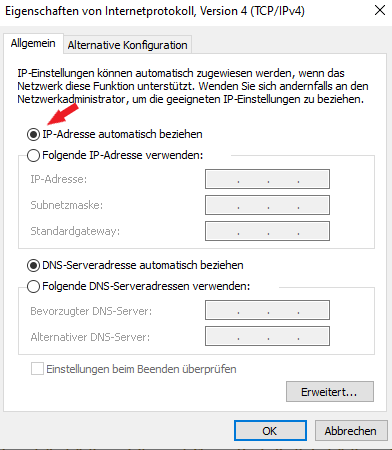
The configuration is now complete.
5. Install FEMS App Alpitronic Hypercharger
In the FEMS App Center you will find all installable FEMS Apps — such as the FEMS App Alpitronic Hypercharger.
|
In dem Benutzerhandbuch FEMS App Center finden Sie eine ausführliche Anleitung zur Bedienung des FEMS App-Center. Des Weiteren wird beschrieben, wie ein Lizenzschlüssel registriert und eingelöst wird. |
Folgen Sie anschließend den Anweisungen des FEMS App Installationsassistenten Ihrer {box-name}.
5.1. Installationsassistent
You will then be taken to the installation wizard for FEMS App Alpitronic Hypercharger.

Some of the input fields are pre-filled. Nevertheless, enter your data if it differs from the default values (e. g. IP address). Otherwise, the default values can be retained (e. g. port, Modbus unit ID).
| Mandatory fields are marked with * |
| Check your entries and make sure that they are correct. Otherwise the respective app will not work properly! |
For the Alpitronic Hypercharger HYC150 or HYC300, please select "2" for the number of charging points.
Use the drop-down menu to select the number of charging points.
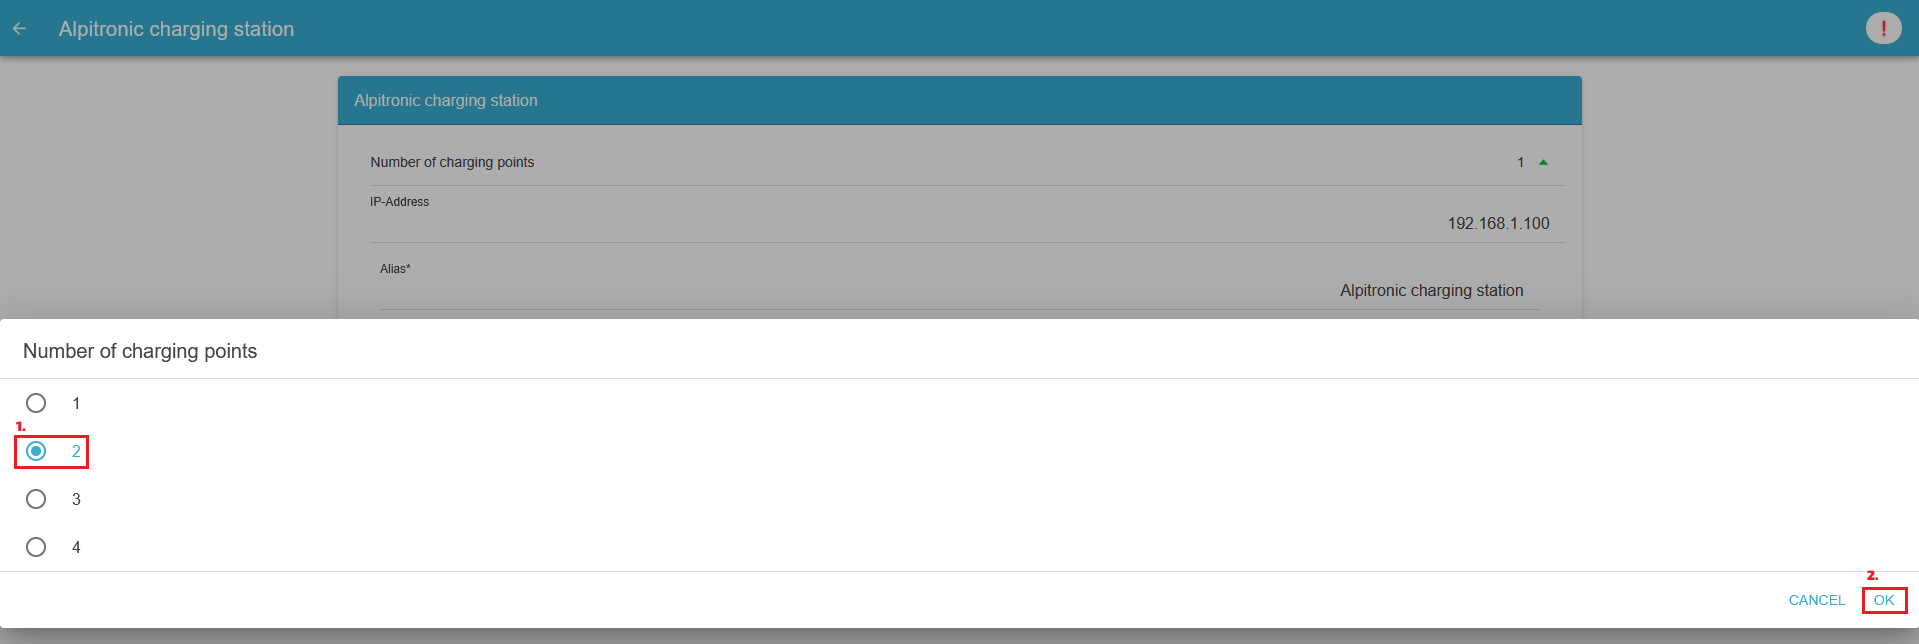
Confirm with "OK".
Please note that the IP addresses for the right and left charging points of the Alpitronic Hypercharger HYC150 or HYC300 must be entered separately.
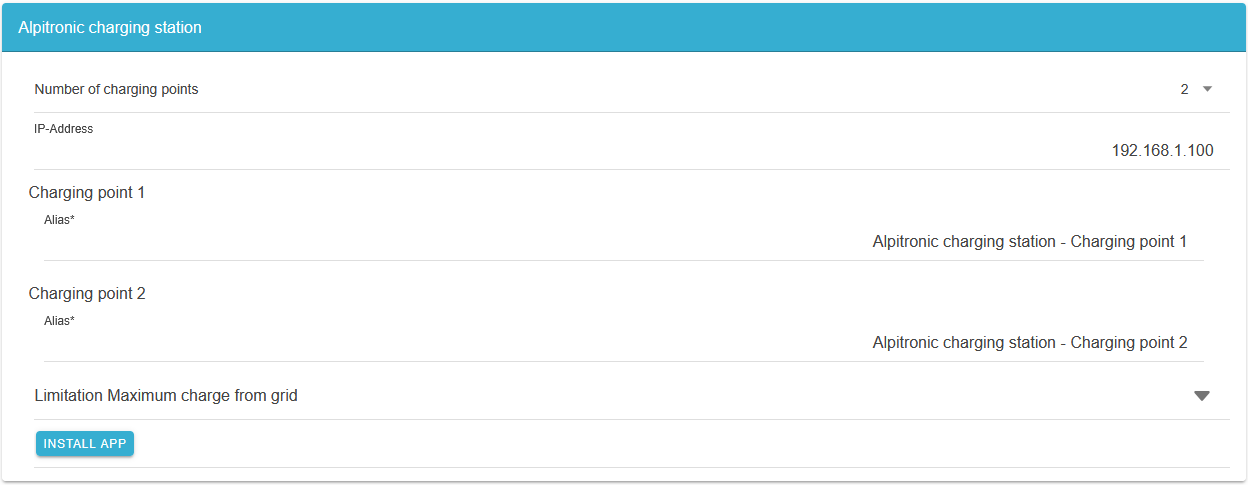
From the second charging point, a limitation of the maximum grid consumption in watts must be set.
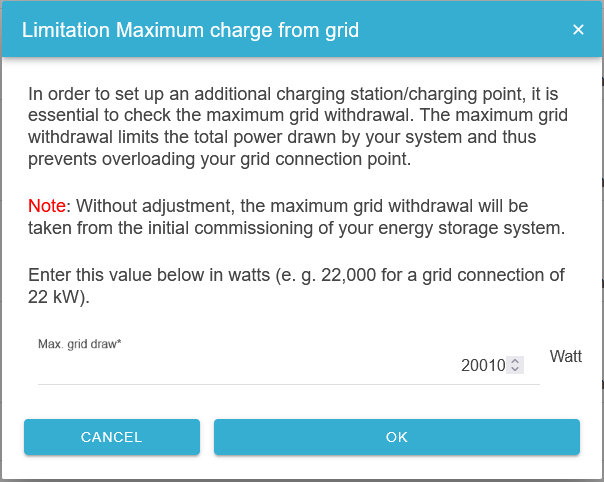
Please confirm that you have read the note and filled in the value correctly.
Confirm with "OK".
Then click on "Install app".
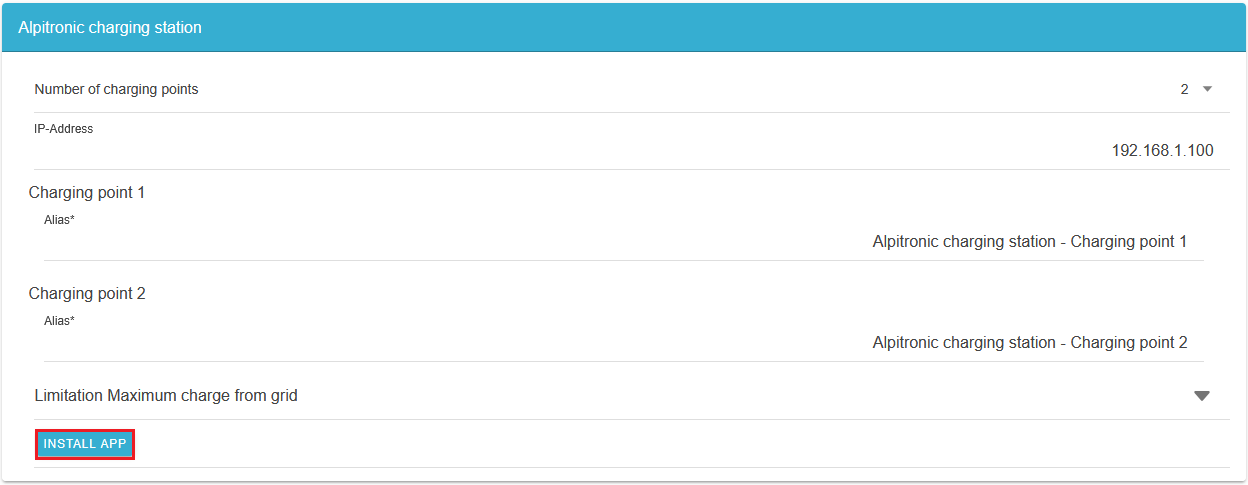
Once the installation process is complete, the new app appears in the overview of the FEMS App center in the "Installed" category.
The FEMS App Alpitronic Hypercharger has been successfully installed.
5.2. Edit FEMS app
|
Bereits installierte Apps können nachträglich bearbeitet werden, um Konfigurationseinstellungen zu ändern. Wählen Sie hierzu die jeweilige App in der FEMS App Center Übersicht aus und klicken Sie auf die Schaltfläche "App bearbeiten". Eine detaillierte Anleitung hierzu finden Sie im Benutzerhandbuch FEMS App Center. |